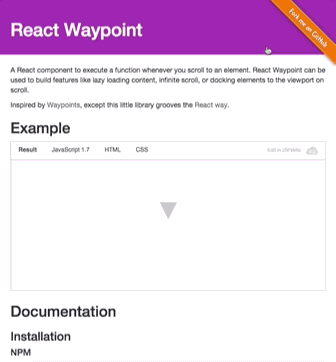
React Waypoint

A React component to execute a function whenever you scroll to an element. Works in all containers that can scroll, including the window.
React Waypoint can be used to build features like lazy loading content, infinite scroll, scrollspies, or docking elements to the viewport on scroll.
Inspired by Waypoints, except this little library grooves the React way.
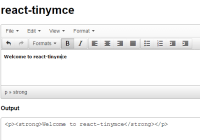
Demo
[View demo page][demo-page]
Installation
npm
npm install react-waypoint --saveyarn
yarn add react-waypointUsage
import { Waypoint } from 'react-waypoint'; <Waypoint onEnter={this._handleWaypointEnter} onLeave={this._handleWaypointLeave} />A waypoint normally fires onEnter and onLeave as you are scrolling, but it can fire because of other events too:
- When the window is resized
- When it is mounted (fires
onEnterif it's visible on the page) - When it is updated/re-rendered by its parent
Callbacks will only fire if the new position changed from the last known position. Sometimes it's useful to have a waypoint that fires onEnter every time it is updated as long as it stays visible (e.g. for infinite scroll). You can then use a key prop to control when a waypoint is reused vs. re-created.
<Waypoint key={cursor} onEnter={this._loadMoreContent} />Alternatively, you can also use an onPositionChange event to just get notified when the waypoint's position (e.g. inside the viewport, above or below) has changed.
<Waypoint onPositionChange={this._handlePositionChange} />Waypoints can take a child, allowing you to track when a section of content enters or leaves the viewport. For details, see Children, below.
<Waypoint onEnter={this._handleEnter}> <div> Some content here </div> </Waypoint>Example: JSFiddle Example
Prop types
propTypes: { /** * Function called when waypoint enters viewport */ onEnter: PropTypes.func, /** * Function called when waypoint leaves viewport */ onLeave: PropTypes.func, /** * Function called when waypoint position changes */ onPositionChange: PropTypes.func, /** * Whether to activate on horizontal scrolling instead of vertical */ horizontal: PropTypes.bool, /** * `topOffset` can either be a number, in which case its a distance from the * top of the container in pixels, or a string value. Valid string values are * of the form "20px", which is parsed as pixels, or "20%", which is parsed * as a percentage of the height of the containing element. * For instance, if you pass "-20%", and the containing element is 100px tall, * then the waypoint will be triggered when it has been scrolled 20px beyond * the top of the containing element. */ topOffset: PropTypes.oneOfType([ PropTypes.string, PropTypes.number, ]), /** * `bottomOffset` is like `topOffset`, but for the bottom of the container. */ bottomOffset: PropTypes.oneOfType([ PropTypes.string, PropTypes.number, ]), /** * Scrollable Ancestor - A custom ancestor to determine if the * target is visible in it. This is useful in cases where * you do not want the immediate scrollable ancestor to be * the container. For example, when your target is in a div * that has overflow auto but you are detecting onEnter based * on the window. * * This should typically be a reference to a DOM node, but it will also work * to pass it the string "window" if you are using server rendering. */ scrollableAncestor: PropTypes.any, /** * fireOnRapidScroll - if the onEnter/onLeave events are to be fired * on rapid scrolling. This has no effect on onPositionChange -- it will * fire anyway. */ fireOnRapidScroll: PropTypes.bool, /** * Use this prop to get debug information in the console log. This slows * things down significantly, so it should only be used during development. */ debug: PropTypes.bool, },All callbacks (onEnter/onLeave/onPositionChange) receive an object as the only argument. That object has the following properties:
currentPosition- the position that the waypoint has at the moment. One ofWaypoint.below,Waypoint.above,Waypoint.inside, andWaypoint.invisible.previousPosition- the position that the waypoint had before. Also one ofWaypoint.below,Waypoint.above,Waypoint.inside, andWaypoint.invisible.
In most cases, the above two properties should be enough. In some cases though, you might find these additional properties useful:
event- the native scroll event that triggered the callback. May be missing if the callback wasn't triggered as the result of a scroll.waypointTop- the waypoint's distance to the top of the viewport.viewportTop- the distance from the scrollable ancestor to the viewport top.viewportBottom- the distance from the bottom of the scrollable ancestor to the viewport top.
If you use es6 object destructuring, this means that you can use waypoints in the following way:
<Waypoint onEnter={({ previousPosition, currentPosition, event }) => { // do something useful! }} />If you are more familiar with plain old js functions, you'll do something like this:
<Waypoint onEnter={function(props) { // here you can use `props.currentPosition`, `props.previousPosition`, and // `props.event` }} />Offsets and Boundaries
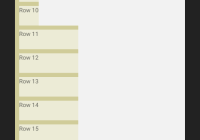
Two of the Waypoint props are topOffset and bottomOffset. To appreciate what these can do for you, it will help to have an understanding of the "boundaries" used by this library. The boundaries of React Waypoint are the top and bottom of the element containing your scrollable content (although this element can be configured). When a waypoint is within these boundaries, it is considered to be "inside." When a waypoint passes beyond these boundaries, then it is "outside." The onEnter and onLeave props are called as an element transitions from being inside to outside, or vice versa.
The topOffset and bottomOffset properties can adjust the placement of these boundaries. By default, the offset is '0px'. If you specify a positive value, then the boundaries will be pushed inward, toward the center of the page. If you specify a negative value for an offset, then the boundary will be pushed outward from the center of the page.
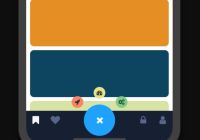
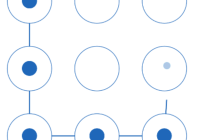
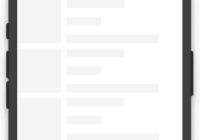
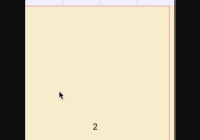
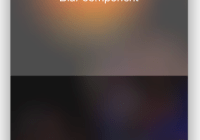
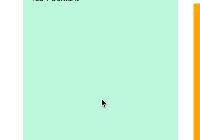
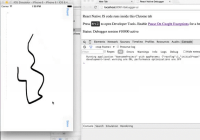
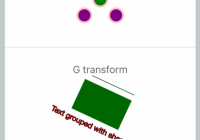
Here is an illustration of offsets and boundaries. The black box is the scrollableAncestor. The pink lines represent the location of the boundaries. The offsets that determine the boundaries are in light pink.

Horizontal Scrolling Offsets and Boundaries
By default, waypoints listen to vertical scrolling. If you want to switch to horizontal scrolling instead, use the horizontal prop. For simplicity's sake, all other props and callbacks do not change. Instead, topOffset and bottomOffset (among other directional variables) will mean the offset from the left and the offset from the right, respectively, and work exactly as they did before, just calculated in the horizontal direction.
Example Usage
Positive values of the offset props are useful when you have an element that overlays your scrollable area. For instance, if your app has a 50px fixed header, then you may want to specify topOffset='50px', so that the onEnter callback is called when waypoints scroll into view from beneath the header.
Negative values of the offset prop could be useful for lazy loading. Imagine if you had a lot of large images on a long page, but you didn't want to load them all at once. You can use React Waypoint to receive a callback whenever an image is a certain distance from the bottom of the page. For instance, by specifying bottomOffset='-200px', then your onEnter callback would be called when the waypoint comes closer than 200 pixels from the bottom edge of the page. By placing a waypoint near each image, you could dynamically load them.
There are likely many more use cases for the offsets: be creative! Also, keep in mind that there are two boundaries, so there are always two positions when the onLeave and onEnter callback will be called. By using the arguments passed to the callbacks, you can determine whether the waypoint has crossed the top boundary or the bottom boundary.
Children
If you don't pass a child into your Waypoint, then you can think of the waypoint as a line across the page. Whenever that line crosses a boundary, then the onEnter or onLeave callbacks will be called.
If you do pass a child, it can be a single DOM component (e.g. <div>) or a composite component (e.g. <MyComponent />).
Waypoint needs a DOM node to compute its boundaries. When you pass a DOM component to Waypoint, it handles getting a reference to the DOM node through the ref prop automatically.
If you pass a composite component, you can wrap it with React.forwardRef (requires react@^16.3.0) and have the ref prop being handled automatically for you, like this:
class Block extends React.Component { render() { return <div ref={this.props.innerRef}>Hello</div> } } const BlockWithRef = React.forwardRef((props, ref) => { return <Block innerRef={ref} {...props} /> }) const App = () => ( <Waypoint> <BlockWithRef /> </Waypoint> )If you can't do that because you are using older version of React then you need to make use of the innerRef prop passed by Waypoint to your component. Simply pass it through as the ref of a DOM component and you're all set. Like in this example:
class Block extends React.Component { render() { return <div ref={this.props.innerRef}>Hello</div> } } Block.propTypes = { innerRef: PropTypes.func.isRequired, } const App = () => ( <Waypoint> <Block /> </Waypoint> )The onEnter callback will be called when any part of the child is visible in the viewport. The onLeave callback will be called when all of the child has exited the viewport.
(Note that this is measured only on a single axis. What this means is that for a Waypoint within a vertically scrolling parent, it could be off of the screen horizontally yet still fire an onEnter event, because it is within the vertical boundaries).
Deciding whether to pass a child or not will depend on your use case. One example of when passing a child is useful is for a scrollspy (like Bootstrap's). Imagine if you want to fire a waypoint when a particularly long piece of content is visible onscreen. When the page loads, it is conceivable that both the top and bottom of this piece of content could lie outside of the boundaries, because the content is taller than the viewport. If you didn't pass a child, and instead put the waypoint above or below the content, then you will not receive an onEnter callback (nor any other callback from this library). Instead, passing this long content as a child of the Waypoint would fire the onEnter callback when the page loads.
Containing elements and scrollableAncestor
React Waypoint positions its boundaries based on the first scrollable ancestor of the Waypoint.
If that algorithm doesn't work for your use case, then you might find the scrollableAncestor prop useful. It allows you to specify what the scrollable ancestor is. Pass a reference to a DOM node as that prop, and the Waypoint will use the scroll position of that node, rather than its first scrollable ancestor.
This can also be the string "window", which can be useful if you are using server rendering.
Example Usage
Sometimes, waypoints that are deeply nested in the DOM tree may need to track the scroll position of the page as a whole. If you want to be sure that no other scrollable ancestor is used (since, once again, the first scrollable ancestor is what the library will use by default), then you can explicitly set the scrollableAncestor to be the window to ensure that no other element is used.
This might look something like:
<Waypoint scrollableAncestor={window} onEnter={this._handleWaypointEnter} onLeave={this._handleWaypointLeave} />Troubleshooting
If your waypoint isn't working the way you expect it to, there are a few ways you can debug your setup.
OPTION 1: Add the debug={true} prop to your waypoint. When you do, you'll see console logs informing you about the internals of the waypoint.
OPTION 2: Clone and modify the project locally.
- clone this repo
- add
console.logor breakpoints where you think it would be useful. npm linkin the react-waypoint repo.npm link react-waypointin your project.- if needed rebuild react-waypoint module:
npm run build-npm
Limitations
In this component we make a few assumptions that we believe are generally safe, but in some situations might present limitations.
- We determine the scrollable-ness of a node by inspecting its computed overflow-y or overflow property and nothing else. This could mean that a container with this style that does not actually currently scroll will be considered when performing visibility calculations.
- We assume that waypoints are rendered within at most one scrollable container. If you render a waypoint in multiple nested scrollable containers, the visibility calculations will likely not be accurate.
- We also base the visibility calculations on the scroll position of the scrollable container (or
windowif no scrollable container is found). This means that if your scrollable container has a height that is greater than the window, it might triggeronEnterunexpectedly.
In the wild
Organizations and projects using react-waypoint.
Credits
Credit to trotzig and lencioni for writing this component, and Brigade for open sourcing it.
Thanks to the creator of the original Waypoints library, imakewebthings.
License
Make sure to check out other popular open-source tools from the Brigade team: dock, overcommit, haml-lint, and scss-lint.