
Create ReactJS uncontrolled form structures with nested fields, validations and much more! 🚀


Overview
Unform is a performance focused library that helps you creating beautiful forms in React with the power of uncontrolled components performance and React Hooks.
Table of contents
- Key features
- Why not Formik, Redux Form or another library?
- Roadmap
- Installation
- Guides
- Custom elements
- Contributing
- License
Key features
- Beautiful syntax;
- React Hooks
😍 ; - Performance focused;
- Use of uncontrolled components;
- Integration with pickers, dropdowns and other libraries;
Why not Formik, Redux Form or another library?
Formik/Redux Form has a really great syntax while it has a really poor support to uncontrolled components and deep nested data structures. With unform it's easy to create forms with complex relationships without losing performance.
Roadmap
- Native checkbox/radio support;
- React Native support (should we?);
- Better docs;
Installation
Just add unform to your project:
yarn add @rocketseat/unform Guides
Basics
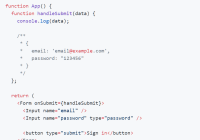
Unform exposes two default form elements: <Input /> and <Select />. Currently, <Select /> element does not support multiple values, you can use React Select example to achieve that.
import React from 'react'; import { Form, Input } from '@rocketseat/unform'; function App() { function handleSubmit(data) { console.log(data); /** * { * email: 'email@example.com', * password: '123456' * } */ } return ( <Form onSubmit={handleSubmit}> <Input name="email" /> <Input name="password" type="password" /> <button type="submit">Sign in</button> </Form> ); }Elements
Unform exposes two elements by default, Input and Select.
Input element
Input elements can receive a multiline prop that will render a textarea instead.
import React from 'react'; import { Form, Input } from '@rocketseat/unform'; function App() { function handleSubmit(data) {} return ( <Form onSubmit={handleSubmit}> <Input name="name" /> <Input multiline name="bio" /> <button type="submit">Send</button> </Form> ); }Select element
import React from 'react'; import { Form, Select } from '@rocketseat/unform'; const options = [ { id: 'react', title: 'ReactJS' }, { id: 'node', title: 'NodeJS' }, { id: 'rn', title: 'React Native' }, ]; function App() { function handleSubmit(data) {} return ( <Form onSubmit={handleSubmit}> <Select name="tech" options={options} /> <button type="submit">Send</button> </Form> ); }File Input element
FileInput components may receive an onStartProgress property that will be called when file loading starts.
import React from 'react'; import { Form, FileInput } from '@rocketseat/unform'; function App() { function handleSubmit(data) {} function handleProgress(progress, event) {} return ( <Form onSubmit={handleSubmit}> <FileInput name="attach" onStartProgress={handleProgress} /> <button type="submit">Send</button> </Form> ); }Reset form
import React from 'react'; import { Form, Input } from '@rocketseat/unform'; function App() { function handleSubmit(data, { resetForm }) { resetForm(); } return ( <Form onSubmit={handleSubmit}> <Input name="email" /> <Input name="password" type="password" /> <button type="submit">Sign in</button> </Form> ); }Nested fields
import React from 'react'; import { Form, Input, Scope } from '@rocketseat/unform'; function App() { function handleSubmit(data) { console.log(data); /** * { * name: 'Diego', * address: { street: "Name of street", number: 123 } * } */ } return ( <Form onSubmit={handleSubmit}> <Input name="name" /> <Scope path="address"> <Input name="street" /> <Input name="number" /> </Scope> <button type="submit">Save</button> </Form> ); }Initial data
Optional: Here you can set what the initial data for each field will be, you store the initial field values into a variable and load it in the Form using the prop initialData.
import React from 'react'; import { Form, Input, Scope } from '@rocketseat/unform'; function App() { const initialData = { name: 'John Doe', address: { street: 'Sample Avenue', }, }; function handleSubmit(data) {} return ( <Form onSubmit={handleSubmit} initialData={initialData}> <Input name="name" /> <Scope path="address"> <Input name="street" /> <Input name="number" /> </Scope> <button type="submit">Save</button> </Form> ); }Validation
When you define your schema to validation, only data defined in it will be sent to
datainonSubmitevent even though there are other fields.
import React from 'react'; import { Form, Input } from '@rocketseat/unform'; import * as Yup from 'yup'; const schema = Yup.object().shape({ email: Yup.string() .email('Custom invalid email message') .required('Custom required message'), password: Yup.string() .min(4) .required(), }); function App() { function handleSubmit(data) {} return ( <Form schema={schema} onSubmit={handleSubmit}> <Input name="email" /> <Input name="password" type="password" /> <button type="submit">Save</button> </Form> ); }Styling
The Form component exposes two props for that: style and className. You can use any CSS-in-JS library to style your form or just pass the class name string, or even the style object directly! For example:
import styled from 'styled-components'; // or emotion, for example // weird choice for a background color, huh? export default styled(MyForm)` background: red; `;Manipulate data
import React, { useState } from 'react'; import { Form, Input } from '@rocketseat/unform'; import * as Yup from 'yup'; const schema = Yup.object().shape({ name: Yup.string().required(), email: Yup.string() .email() .required(), password: Yup.string().when('$updatePassword', { is: true, then: Yup.string() .min(4) .required(), otherwise: Yup.string().strip(true), }), }); function App() { const [updatePassword, setUpdatePassword] = useState(false); const initialData = { name: 'John Doe', email: '[email protected]', }; function handleSubmit(data) {} return ( <Form schema={schema} initialData={initialData} context={{ updatePassword }} onSubmit={handleSubmit} > <Input name="name" /> <Input name="email" /> <input type="checkbox" name="Update Password" checked={updatePassword} onChange={e => setUpdatePassword(e.target.checked)} /> <Input name="password" type="password" /> <button type="submit">Save</button> </Form> ); }Custom elements
Sometimes we need to use third-party component in our forms. But don't you worry, Unform has your back! You can do that via useField which provides all the resources you need to use your component with Unform.
Below are some examples with react-select and react-datepicker.
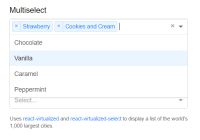
React select
import React, { useRef, useEffect } from 'react'; import Select from 'react-select'; import { useField } from '@rocketseat/unform'; export default function ReactSelect({ name, label, options, multiple, ...rest }) { const ref = useRef(null); const { fieldName, registerField, defaultValue, error } = useField(name); function parseSelectValue(selectValue) { if (!multiple) { return selectValue ? selectValue.id : ''; } return selectValue ? selectValue.map(option => option.id) : []; } useEffect(() => { registerField({ name: fieldName, ref: ref.current, path: 'state.value', parseValue: parseSelectValue, clearValue: selectRef => { selectRef.select.clearValue(); }, }); }, [ref.current, fieldName]); function getDefaultValue() { if (!defaultValue) return null; if (!multiple) { return options.find(option => option.id === defaultValue); } return options.filter(option => defaultValue.includes(option.id)); } return ( <> {label && <label htmlFor={fieldName}>{label}</label>} <Select name={fieldName} aria-label={fieldName} options={options} isMulti={multiple} defaultValue={getDefaultValue()} ref={ref} getOptionValue={option => option.id} getOptionLabel={option => option.title} {...rest} /> {error && <span>{error}</span>} </> ); }React datepicker
import React, { useRef, useEffect, useState } from 'react'; import ReactDatePicker from 'react-datepicker'; import { useField } from '@rocketseat/unform'; import 'react-datepicker/dist/react-datepicker.css'; export default function DatePicker({ name }) { const ref = useRef(null); const { fieldName, registerField, defaultValue, error } = useField(name); const [selected, setSelected] = useState(defaultValue); useEffect(() => { registerField({ name: fieldName, ref: ref.current, path: 'props.selected', clearValue: pickerRef => { pickerRef.clear(); }, }); }, [ref.current, fieldName]); return ( <> <ReactDatePicker name={fieldName} selected={selected} onChange={date => setSelected(date)} ref={ref} /> {error && <span>{error}</span>} </> ); }Contributing
Thanks for being interested on making this package better. We encourage everyone to help improving this project with some new features, bug fixes and performance issues. Please take a little bit of your time to read our guides, so this process can be faster and easier.
Contribution Guidelines
Take a moment to read about our Contribution Guidelines so you can understand how to submit an issue, commit and create pull requests.
Code of Conduct
We expect you to follow our Code of Conduct. You can read it to understand what kind of behaviour will and will not be tolerated.
License
MIT © Rocketseat