PrimeNGAdvancedGrowl


Table of Contents generated with DocToc
- AdvGrowlModul
AdvGrowlModul
The AdvGrowlModule is a wrapper around the growl module from PrimeNG. This wrapper was created because PrimeNG is missing some features.
- If you have a feature request or noticed a bug please open an issue under: https://github.com/kreuzerk/primeNG-advanced-growl/issues
- If you have questions about the module or want to discuss new ideas or improvements please use our chat at: https://gitter.im/primeNG-advanced-growl/Lobby
- Contributions are welcome. Just fork the repo and create a Pull Request.
Demo and Blogposts
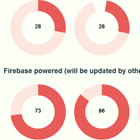
- You can find a working demo of the growl module on the following link: https://primeng-advanced-growl.firebaseapp.com/
- A blogpost that explains how to make sure that your users do not miss error messages is availbale under: https://medium.com/@kevinkreuzer/primeng-advanced-growl-make-sure-your-users-see-the-errors-6988f722fb8f
What is missing on PrimeNG?
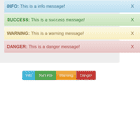
- PrimeNG growl offers us to define a sticky property to remove the messages. When we set the lifetime of the messages to 3 seconds all messages will be removed after the specified time. The problem comes when a message gets created 2 seconds after the first message. This message will not be removed after the specified 3 seconds. This message will be removed 1 seconds after creation. This is the point where the 3 seconds from the first message have passed.
What is the AdvGrowlModule offering?
- It allows you to choose a default lifetime for each message. Each message receives this lifetime when it is created. This feature differs from the original primeng growl module because the lifetime is unique for each message.
- It allows you to choose if you want to freeze all messages on hover. If you enable this feature and hover over a message all messages will internally stop their timer and wait until you leave the messages again. Each message will restart its timer with the remaining time.
- In addition to freezing all messages you also have the possibility to freeze only one message on hover.
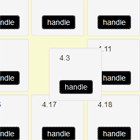
- You can limit the number of messages that will be displayed on screen. Notice that all other messages that can not be displayed are cached and will be displayed as soon as another spot is available.
- You can optionally pas additional properties to each of your messages. You can then retrieve those properties by clicking on a message as an output event.
- The newest and one of the most powerful features was released in the 3.1.0-reindeer version. Additionally to the default lifetime you can now specify a new unique lifeTime for each message. This means you can say I want to create a info message with a lifetime of 2 seconds, a success message with a lifetime of 3 seconds and so on. This is also the feature we are going to use to make sure that our users do not miss error messages.
How do you use PrimeNGAdvancedGrowl?
installation
PrimeNGAdvancedGrowl is an node_module and therefore it is provided over npm. To install it node and npm are required.
npm install --save primeng-advanced-growl To have all the primeNG styles available you need to import the following stylesheets in your application:
"../node_modules/font-awesome/scss/font-awesome.scss", "../node_modules/primeng/resources/primeng.css", "../node_modules/primeng/resources/themes/omega/theme.scss" To use the AdvGrowlService and the AdvGrowlComponent you need to import the AdvGrowlModul in your appliction.
import {AdvGrowlModule} from 'primeng-advanced-growl'; @NgModule({ declarations: [AppComponent], imports: [AdvGrowlModule] }) ...Angular 6
Please notice that only versions 4.x are Angular 6 compatible.
AdvGrowlComponent
The AdvGrowlModule exports a component named AdvGrowlComponent. You need to include this component once in your app.component.html. With the help of this component the advanced PrimeNG growl messages can be displayed.
<app-navbar></app-navbar> <adv-growl></adv-growl> <div class="container"> <router-outlet></router-outlet> </div>The advanced growl messages component has the following in- and outputs.
Input
| Input | Description |
|---|---|
| style | Inline styles that should be applied to the growl component of PrimeNG |
| styleClass | Style class for the growl component of PrimeNG |
| life: number (default = 0) | A number that represents the lifetime of each growl message. If set to 3000 each message will be disappear after 3 seconds. If no life param is passed to the components the growl messages are sticky and do not disappear until you call clearMessages or click on the cancel x on a message |
| freezeMessagesOnHover: boolean (default: false) | This flag is only useful if you also pass a life time. When you pass this property to the component messages are freezed when you hover over them. Let's say you have for example 3 messages all with a lifetime of 3 seconds. When you hover after 2 seconds over the second message all messages on the screen are freezed and do not disappear. After you leave the messages each message will disappear after the specified lifetime. With the pauseOnlyHoveredMessage you can control if you want all messages or only the hoverd message to disappear |
| pauseOnlyHoveredMessage (default: false) | This flag indicates if only the hovered message should be paused. If set to true only the hoverd message will be paused. If set to false all messages will be paused on hover. Notice that this flag is only useful if you set a lifetime that is bigger than 0 and you set the freezeMessagesOnHover flag to true |
| messageSpots (default: 0 (unlimited)) | This property gives you the possibility to limit the number of messages displayed on screen. This feature is very useful in combination with the life property. With this combination all messages that can currently not be displayed due to missing message spots will be cached. Those cached messages will appear as soon as a spot is available. Notice that a dynamic change of this property during runtime removes all currently displayed messages from screen |
Output
| Event | Description |
|---|---|
| onClose: EventEmitter | Emits an event with the closed message. This message is from type AdvPrimeMessage. |
| onClick: EventEmitter | Emits an event with the message from the clicked element. This message is from type AdvPrimeMessage. |
| onMessagesChanges: EventEmitter<Array> | Each time a message is created or removed it emits an array of all messages shown on the screen. If you subscribe to this emitter you always know which messages are on the screen. |
Models
export interface AdvPrimeMessage { id: string; severity: string; summary: string; detail: string; additionalProperties?: any; }AdvGrowlService
The AdvGrowlService allows you to create and delete messages. The AdvGrowlService can be accessed over dependency injection inside your component.
import {AdvGrowlService} from 'primeng-advanced-growl'; @Component({ selector: ..., templateUrl: ... }) export class SampleComponent{ constructor(private advGrowlService: AdvGrowlService){ } }The AdvGrowlService provides the following methods to create messages. Each method expects the message content and a message title. If you wish you can also add additional properties. Additional properties are emitted when you click on a message. All of the methods below will use the lifetime you specified on the component via the life input property.
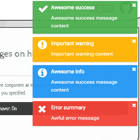
- createSuccessMessage(messageContent: string, summary: string, additionalProperties?: any): AdvPrimeMessage
- createInfoMessage(messageContent: string, summary: string, additionalProperties?: any): AdvPrimeMessage
- createWarningMessage(messageContent: string, summary: string, additionalProperties?: any): AdvPrimeMessage
- createErrorMessage(messageContent: string, summary: string, additionalProperties?: any): AdvPrimeMessage
If you want to create messages that have another lifetime than the one you provided via the life input property you can use the Timed message service methods. Those methods are similar to the methods above but they accept an additional lifeTime property. This lifetime will then be used.
- createTimedSuccessMessage(messageContent: string, summary: string, lifeTime: number, additionalProperties?: any): void
- createTimedInfoMessage(messageContent: string, summary: string, lifeTime: number, additionalProperties?: any): void
- createTimedWarningMessage(messageContent: string, summary: string, lifeTime: number, additionalProperties?: any): void
- createTimedErrorMessage(messageContent: string, summary: string, lifeTime: number, additionalProperties?: any): void
To clear all messages you can call the clearMessages() method from the AdvGrowlService.
Examples
Inside the test folder you can find different examples how to use the library. Below we listed some code samples for common use cases.
Avoid creating success messages with same Summary
If we want to avoid the creation of multiple messages with the same summary or type we could do the following inside our component.
import {AdvPrimeMessage} from '../../lib/messages/adv-growl.model'; @Component({ selector: 'sample-app', template: `<adv-growl [life]="2500" (onMessagesChanges)="onMessages($event)"> </adv-growl> <button pButton type="button" (click)="createNonDuplicatedSuccessMessage()" class="ui-button-success" label="Create success message if none on screen"> </button> ` }) export class AppComponent { messages = []; constructor(private advMessagesService: AdvGrowlService) { } public createSuccessMessage(): void { this.advMessagesService.createSuccessMessage('Awesome success message content', 'Awesome success', { clickMessage: 'Awesome click' }); } public onMessages(messages) { this.messages = messages; } public createNonDuplicatedSuccessMessage(): void { const index = this.messages.findIndex(message => message.summary === 'Awesome success'); if (index < 0) { this.createSuccessMessage() } } }Passing additional properties to the message
If you want to pass some additional informations to your message you can do this by passing those as last optional parameter to the success, warning, info or error method. When you click on your message the event will then contain your additionalProperties.
import {AdvPrimeMessage} from '../../lib/messages/adv-growl.model'; @Component({ selector: 'sample-app', template: `<adv-growl [life]="2500" (onMessagesChanges)="onMessages($event)" (onClick)="logMessage($event)"> </adv-growl> <button pButton type="button" (click)="createSuccessMessageWithAdditionalInfos()" class="ui-button-success" label="Create success message with additional properties"> </button> ` }) export class AppComponent { messages = []; constructor(private advMessagesService: AdvGrowlService) { } public createSuccessMessageWithAdditionalInfos(): void { this.advMessagesService.createSuccessMessage('Awesome success message content', 'Awesome success', { clickMessage: 'Awesome click' }); } public logMessage(message: AdvPrimeMessage) { if (message.additionalProperties) { console.log(message.additionalProperties.clickMessage) } else { console.log('You clicked on message', message) } } }Do not let error messages disappear automatically
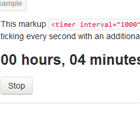
Letting messages disappear within the given time is a cool feature. But sometimes you do not want let messages disappear automatically because you are then risking that the user misses the message. This is often the case with error messages. Primeng-advanced-growl allows you to use the "timed" methods to specify the message for each created message. This gives you a lot of power. With this API you can easily create all messages with a lifeTime of 0. Rember that 0 is equal to sticky.
import {AdvPrimeMessage} from '../../lib/messages/adv-growl.model'; @Component({ selector: 'sample-app', template: `<adv-growl [life]="2500" (onMessagesChanges)="onMessages($event)" (onClick)="logMessage($event)"> </adv-growl> <button pButton type="button" (click)="createTimedErrorMessage()" class="ui-button-success" label="Create sticky error message"> </button> ` }) export class AppComponent { messages = []; constructor(private advMessagesService: AdvGrowlService) { } public createTimedErrorMessage(): void { this.advMessagesService.createTimedErrorMessage('Click me or I will stay forever', 'Watch out', 0, { clickMessage: 'Awesome click' }); } }