angular-table-restful
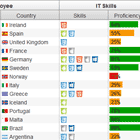
A table for AngularJs with support for restful API standard.
DEMO
Install
-
Use bower to install the package:
bower install angular-table-restful --save
-
Or manually add the following files to your page:
<link rel="stylesheet" href="../angular-table-restful.css"> <script src='../angular-table-restful.js'></script>
-
Include module dependency:
angular.module('yourApp', ['angular-table']);
======
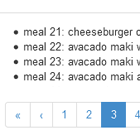
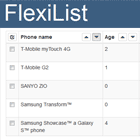
API Pagination
-
You have a large data set and don't want to load it all at once when the page is loaded? So you came to the right place.
-
With API Pagination support you don't need to load hundreds or thousands of lines of data at once, you simply load only the page that you want making the request to the back-end service light, fast and simple.
-
See more details here.
======
How To Use
- atTable
- atPaginated
- atAttribute
- atTitle
- atSortable
- atScroll
- atEllipsis
- atLoadOnStartup
- atPagesToShow
- InMemory Example
- API Pagination Example
- Events
atTable
- This is the main attribute that you are going to use and where the magic happens. It receives both the data that will be used to load the grid (in memory) and also receives an object or a function that will be used to manipulate the API Pagination data.
atPaginated
- This attribute is responsible for displaying the pagination at the bottom of the table. In case you don't want to display it, just don't use this attribute.
atAttribute
- This attribute is responsible for binding the items in the array and creating the header for each one of them (The value should match with item's attribute name).
atIgnoreHeader
- This attribute is responsible for unbinding the
at-attributeheader, rendering only thetheadthat is written explicitly in the html allowing you to customize the header the way you want it. e.g.:
<!-- Keep in mind that you can add ng-if/ng-show or anything that you want to make the table that matches your needs --> <table at-table="vm.myList"> <thead at-ignore-header> <tr> <th> <!-- Some custom header, like a checkbox to check all items or make a group header separator--></th> </tr> </thead> <tbody> <tr> <td><!-- Some custom item, like a checkbox or a group of headers --></td> </tr> </tbody> </table>atTitle
- This attribute is responsible for changing the header name that will be displayed. If this attribute is not used, the default will be the atAttribute value.
atSortable
- This attribute is responsible for enabling sort at the specific column. If this attribute is not used, the column will not be sortable.
atScroll
- This attribute is responsible for adding a horizontal scroll to the table for responsive purposes. By default if you resize your browser you'll see the scroll, if you don't want it you need to add this attribute and set it to false. e.g.:
<table at-scroll="false">atEllipsis
- This attribute is responsible for adding a '...' at the end of each cell when it's content is too large. Its a default behavior, in case you don't want it add the attribute and set it to false. e.g.:
<table at-ellipsis="false">atLoadOnStartup
- (API Pagination only) This attribute is responsible for loading the table when the page is loaded, triggering the changeEvent function. e.g.:
- 1st way:
html <table at-load-on-startup> - 2nd way: Inside the controller, at the
vm.myTableConfigadd the following attribute:
- 1st way:
```javascript vm.myTableConfig = { ... loadOnStartup: true }; ``` atPagesToShow
- (API Pagination only) This attribute is responsible for the number of pages that will be displayed in the pagination (default: 5). e.g.:
<table at-pages-to-show="10">InMemory Example:
- All you need to do here is pass the data and the grid will be ready to go with all the items loaded.
+ View ```html <table at-table="vm.myList" at-paginated> <tbody> <tr> <td at-sortable at-attribute="index" at-title="Index"></td> <td at-sortable at-attribute="name" at-title="Name"></td> <td at-sortable at-attribute="email" at-title="Email"></td> </tr> </tbody> </table> ``` + Controller ```javascript angular.module("angular-table-restful-example") .controller("basicExampleCtrl", [function() { var vm = this; vm.myList = [ { id: 1, name: 'Sample Name', email: '[email protected]' } ... ] }]); ``` API Pagination Example
- View
<table at-table="vm.myTableConfig" at-paginated> <tbody> <tr> <td at-sortable at-attribute="index" at-title="Index"></td> <td at-sortable at-attribute="name" at-title="Name"></td> <td at-sortable at-attribute="email" at-title="Email"></td> </tr> </tbody> </table>-
Controller
angular.module("angular-table-restful-example") .controller("basicExampleCtrl", ['$http', function($http) { var vm = this; vm.myTableConfig = { changeEvent: tableChangeEvt }; function tableChangeEvt(pageInfo, deferred) { var page = 'page' + pageInfo.pageNo + '.json'; $http.get('api/' + page).then(function(successData){ deferred.resolve(successData.data); }, function(errorData){ alert('Something went wrong with the API call :('); }); } }]);
-
vm.myTableConfigmust have a changeEvent function that will be triggered for the API Pagination to work. -
Also you can access a lot of the table's functionalities from your controller through the
vm.myTableConfigbecause the angular-table-restful injects methods and attributes to it, making data manipulation easy. e.g.:- getList -> Function that returns the elements currently displayd on screen
- clearData -> Function to clear all table items, making it empty and displaying default emptyTableTemplate message.
- clearTable -> Function to clear all table making it's list null and not displaying any message or items, just the table's headers
- hasData -> Function that verifies if the table has items.
- refresh -> Function that updates the table and goes back to 1st page (triggers the changeEvent).
- refreshAndKeepCurrentPage -> Same as refresh but the table stays at the current page.
- refreshAndGoToLastPage -> Same as refresh but the table goes to the last page.
- predicates -> List of all the current predicates of the table.
- sortList -> List of all columns that are sorting the table.
- currentPage -> Attribute that has the currentPage of the table
- prepareData -> Its a function that treats the data. Beacuse the table needs to receive an array with the items and two properties(pageNo and totalCount). You must do this treatment otherwise the table won't work properly. The default function will convert an object with an array and those two properties into an array with the same properties. You can overwrite this function and do your own treatment.
- In case you have a checkbox column you'll need to set two properties in order for the checked items to be saved throughout pagination and for this feature to work (Angular filter):
vm.myTableConfig = { ... //The 'Primary Key' for your table. Put in here the property that will identify each item. checkedKey: function() { return "id"; }, //How the table will know that an item is checked? Put here a filter that will tell it that. //It can be a string/object/function. See the doc above for 'Angular filter'. checkedFilter: function() { return { selected: true }; } ... };
-
getCheckedItems -> Returns all the items that are checked.
-
checkAllItems(bool) -> For the checkbox header that will check the entire page use this function (param 'bool' should be true to check and false for uncheck all). But for it to work, you'll need to set one property into your config. It receives each table item at a time and if should check it or not(It is called from checkAllItems).
-
You can also pass a function on the "onAllChecked" property, this function will be called whenever all the items in the current page get "checked" or, if they are already all "checked", when one of them is "un-checked", and a boolean is passed as a parameters to reflect this. You can use that to keep a master checkbox (one with the function of "Check All") in sync with the page items. Example:
vm.myTableConfig = { ... onAllChecked: function(bool) { //All items are "checked" (bool = true) or they just lost this status (bool = false) vm.myMasterCheckboxModel = bool; } ... };
Usage Example:
View
<table at-table="vm.myTableConfig" at-paginated> <thead> <tr> <th at-attribute="Select" class="text-center"> <input type="checkbox" ng-model="vm.allChecked" ng-change="vm.checkboxChange()"/> </th> </thead> <tbody> <tr> <td at-attribute="Select" class="text-center"> <input type="checkbox" ng-model="item.selected" /> </td> </tr> </tbody>
Controller
vm.myTableConfig = { ... checkItem: function(obj, bool) { //obj -> the item to be checked/unchecked. //Do what you need here to check/uncheck them in your way. obj.selected = bool; } ... }; //When the 'checkAll' checkbox gets triggered. vm.checkboxChange = function checkboxChange() { //This function will trigger the 'checkItem' function for each item in the currentPage checking or unchecking them all. vm.myTableConfig.checkAllItems(vm.allChecked); }
-
Events
The angular-table also broadcasts two events, always passing the config object as the argument (the same on "vm.myTableConfig" for API paginated tables). With this object you can check many properties and values on the table (e.g.: the list of elemets currently displayed or the selected page), and take any action you feel necessary. The two events are:
-
ListChanged - 'Angular-Table-Restful.ListChanged'
- It fully watches every element in the list, and emits this event when something from outside changed any value in any element of the list. That can be caused by user interaction, your controller, etc. It is used only when the table is working "in memory" (not using API pagination), because otherwise the list is not exposed to be changed at all.
-
TableUpdated - 'Angular-Table-Restful.TableUpdated'
- Emitted whenever the table is updated, that can be when the page changes, the list is ordered in someway, or even when an item is "checked" (for this last case, the event is only emitted when the table is paginated through API).
-
Example:
angular.module("angular-table-restful-example") .controller("eventsExampleCtrl", ['$scope', function($scope) { var vm = this; //... $scope.$on('Angular-Table-Restful.TableUpdated', tableChanged); $scope.$on('Angular-Table-Restful.ListChanged', tableChanged); function tableChanged(e, atConfig) { var list = atConfig.getList(); var currentPage = atConfig.currentPage; //.... // Do many wonderful things //... } //... }]);