vuex-shopping-cart
A shopping cart built with Vue 2 and Vuex
Full tutorial on Medium
For an example of a Vue.js shopping cart that does NOT use Vuex check this tutorial and repo
Vuex Tutorial
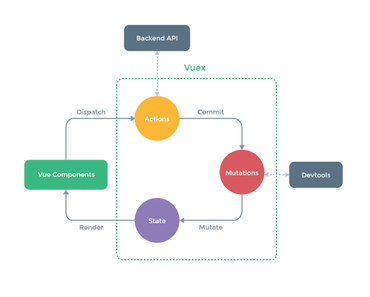
In a previous tutorial we went through the basics of setting up a todo application with Vue.js and Laravel. In this tutorial we will build out a shopping cart application with Vue.js and Vuex. Vuex is a state management library for Vue.js. This means that it helps us keep application state in sync across multiple components and routes through a single source of truth, called a store. In our shopping cart application users will be able to view products, add them to their cart and view the total cost of their order. We will handle routing on the frontend using the official vue-router package.
Why Vuex and what the heck is state management?
Vuex is maintained by the Vue.js core team and brands itself as centralized state management for Vue.js. It is similar to Redux or Flux, application development techniques pioneered by Facebook and the React.js community. If you are unfamiliar with these libraries, not to worry! The Vuex library is for maintaining a global Store that knows about all of the state within our application. In the long run this can make development easier because state is modified and collected from one place instead of many. These changes are then propogated down to the individual components primarily through computed properties.
The source code for the Vuex shopping cart application is available here
Vuex adds some additional complexity upfront but in the long term can make our application development easier, cleaner and faster. If you write client side tests for your application having a single state tree through Vuex can also make the application simpler to reason about.
Alternative approaches
Without Vuex, you could communicate state across components using events and passing properties as in the diagram below. This works well for simple parent to child communication and chances are you already use it in your Vue.js applications!
A more comprehensive approach to state management from the ground up would be to create a store object, attach it to the global namespace and read/write from that.
window.store = { tasks: [{ id: 1, title: 'Learn Vuex' }]}; const vmA = new Vue({ computed: { todos(){ return store.tasks } }, methods: { addTodo(newTodo){ store.tasks.push(newTodo) } } }) const vmB = new Vue({ computed: { todos(){ return store.tasks } }, }) Vuex builds on top of this starting point and adds new concepts like getters, mutations and actions. Let's take a look at how it works by building our shopping cart application.
Create a new Vue app
The first step is to use the Vue CLI that is maintained by the core team. We're going to use the webpack-simple scaffold.
$ vue init webpack-simple vuex-shopping-cart Once you have generated a new application, modify the .babelrc file like so:
"presets": [ ["env", { "modules": false }], "stage-3" ] This gives us the ability to use the ES6 spread operator in our code. You can read more about the spec here.
Install some packages that we will need for the build and the application.
$ npm i vuex vue-router --save $ npm i babel-preset-stage-3 style-loader babel-plugin-transform-object-rest-spread --save-dev The babel stuff isn't strictly required but can make our lives easier down the line. I generally try not to concern myself with webpack and build stuff but in this case it helps.
We're going to use Bulma for styling so add that with font awesome to index.html.
<link rel="stylesheet" href="https://maxcdn.bootstrapcdn.com/font-awesome/4.7.0/css/font-awesome.min.css"> <link rel='stylesheet' href='https://cdnjs.cloudflare.com/ajax/libs/bulma/0.5.2/css/bulma.min.css'> Build the application
Now that we have the application generated let's build out the rest of the shopping cart.
The starting point for our application is in src/main.js.
import Vue from 'vue' import VueRouter from 'vue-router' import store from './store/index.js' import App from './App.vue' import Products from './components/Products.vue' import Cart from './components/Cart.vue' Vue.use(VueRouter) // Define routes const routes = [ { path: '/', component: Products }, { path: '/cart', component: Cart } ] // Register routes const router = new VueRouter({ routes }) new Vue({ el: '#app', render: h => h(App), router, store }) In this file we add code to register our routes and components. We also attach the store to the global Vue app. If you are unfamiliar with ES6 syntax, store in an object is the same as store: store.
In our main App.vue component we will register the base template for our Vue application complete with the NavBar.
src/App.vue
<template> <div id="app" class='container'> <nav-bar></nav-bar> <router-view></router-view> </div> </template> <script> import NavBar from './components/NavBar.vue' export default { name: 'app', components: { NavBar }, data () { return {} } } </script> The product and cart pages will render in the <router-view> element. We can come back to the NavBar a little later, but the full source code for it is available here.
Mutations
Now that we have our application scaffold set up, create a new folder called src/store that will have an index.js and a mutation-types.js file. The mutation types file defines what mutations can occur within our application:
export const ADD_TO_CART = 'ADD_TO_CART' What is a mutation you ask? Mutations change the state of our application. In this case the one thing our application does is modifies the cart state to feature new products as customers add them. Mutations must be synchronous, so no ajax calls belong in mutations.
We have the mutation-types.js file so that our mutations are defined in one place and we can see at a glance all the mutations to the state our app can possibly make.
In the src/store/index.js define our mutations and register our store:
import Vue from 'vue' import Vuex from 'vuex' import * as types from './mutation-types' Vue.use(Vuex) const debug = process.env.NODE_ENV !== 'production' // mutations const mutations = { [types.ADD_TO_CART] (state, { id }) { const record = state.added.find(p => p.id === id) if (!record) { state.added.push({ id, quantity: 1 }) } else { record.quantity++ } } } // one store for entire application export default new Vuex.Store({ state, strict: debug, getters, actions, mutations }) State, Getters and Actions
In the above code we are missing values for store, getters and actions. Those are defined below:
// initial state const state = { added: [], all: [ { id: 'cc919e21-ae5b-5e1f-d023-c40ee669520c', name: 'COBOL 101 vintage', description: 'Learn COBOL with this vintage programming book', price: 399 }, { id: 'bcd755a6-9a19-94e1-0a5d-426c0303454f', name: 'Sharp C2719 curved TV', description: 'Watch TV like never before with the brand new curved screen technology', price: 1995 }, { id: '727026b7-7f2f-c5a0-ace9-cc227e686b8e', name: 'Remmington X mechanical keyboard', description: 'Excellent for gaming and typing, this Remmington X keyboard ' + 'features tactile, clicky switches for speed and accuracy', price: 595 } ] } // getters const getters = { allProducts: state => state.all, // would need action/mutation if data fetched async getNumberOfProducts: state => (state.all) ? state.all.length : 0, cartProducts: state => { return state.added.map(({ id, quantity }) => { const product = state.all.find(p => p.id === id) return { name: product.name, price: product.price, quantity } }) } } // actions const actions = { addToCart({ commit }, product){ commit(types.ADD_TO_CART, { id: product.id }) } } To start with are instantiating a global state with three products and setting our cart (added) to an empty array. If you wanted to load these products in via an ajax call we would require additional mutations to add in products to the state. For the sake of simplicity we are setting up the state with our products statically defined.
Getters are for accessing state values. The official docs define getters as similar to computed properties for stores. In the above code we have a getter to access the products, the number of products and the products within our cart. The map function creates an array specifically for the added key that retains information about the quantity of a particular product the customer would like to order.
Vue.js Components
Now that we have defined our routes and store it's time to build out the components for our application. In the src/components folder add Cart.vue, Products.vue and NavBar.vue files.
The Products component will render a list of the products for sale and feature "Add to Cart" buttons for customers to buy the products.
src/components/Product.vue
<template> <div> <h1 class="title">All Products</h1> <p>{{length}} products</p> <table class="table is-striped"> <thead> <tr> <th>Name</th> <th>Description</th> <th>Price</th> <th></th> </tr> </thead> <tbody> <tr v-for="product in products" track-by="id"> <td>{{product.name}}</td> <td>{{product.description}}</td> <td>${{product.price}}</td> <td><button @click='addToCart(product)' class='button is-info'>Add to cart</button></td> </tr> </tbody> </table> </div> </template> <script> import { mapGetters, mapActions } from 'vuex' export default { name: 'app', computed: mapGetters({ products: 'allProducts', length: 'getNumberOfProducts' }), methods: mapActions([ 'addToCart' ]) } </script> The mapGetters function pairs keys to the results of the getter functions. This means that in our local component state their are products and length values that map to our global store. These values are reactive so that if our state updates within another component these values will also be updates. The mapActions helper maps local methods to the actions we defined within our store.
We can see the value of this when we define our NavBar. In the NavBar we want to show the number of products the user currently has in their cart. To do this we will read from the same state as the products component. Instead of communicating state and forth between siblings and children they read from a single source of truth, the store.
The Javascript for the NavBar looks like this:
src/components/NavBar.vue
import { mapGetters } from 'vuex' export default { computed: { itemsInCart(){ let cart = this.$store.getters.cartProducts; return cart.reduce((accum, item) => accum + item.quantity, 0) } } } And the relevant HTML within the Vue template:
<div class="nav-item is-tab" :class="{ 'active-bottom-border': $route.path === '/cart' }"> <div class="field is-grouped"> <p class="control"> <router-link to='/cart' class="button is-info"> <span class="icon"> <i class="fa fa-shopping-cart"></i> </span> <span>Checkout ({{itemsInCart}})</span> </router-link> </p> </div> </div> The itemsInCart value draws its data from the store and the get cartProducts call. We make modifications to the data in our computed property so that we display the current number of items the customer would like to purchase. The classes here add in styling from the Bulma CSS library and the <router-link> components render anchor tags for navigation.
Finally, we have the Cart component for rendering the items the user would like to buy and the total cost for their order.
src/components/Cart.vue
<template> <div class="cart"> <h1 class="title">Your Cart</h1> <p v-show="!products.length"> <i>Your cart is empty!</i> <router-link to="/">Go shopping</router-link> </p> <table class="table is-striped" v-show="products.length"> <thead> <tr> <td>Name</td> <td>Price</td> <td>Quantity</td> </tr> </thead> <tbody> <tr v-for="p in products"> <td>{{ p.name }}</td> <td>${{ p.price }}</td> <td>{{ p.quantity }}</td> </tr> <tr> <td><b>Total:</b></td> <td></td> <td><b>${{ total }}</b></td> </tr> </tbody> </table> <p><button v-show="products.length" class='button is-primary' @click='checkout'>Checkout</button></p> </div> </template> <script> import { mapGetters } from 'vuex' export default { computed: { ...mapGetters({ products: 'cartProducts' }), total () { return this.products.reduce((total, p) => { return total + p.price * p.quantity }, 0) } }, methods: { checkout(){ alert('Pay us $' + this.total) } } } </script> Here we use computed properties with the mapGetters helper function to bind the added value of the store to products in the local component scope. We read this one to our calculate our total in a value local to this component but that derives its information from the global store. Lastly, we add a method for checkout that shows an alert for the total amount of money the user owes. If you are interested in building out real life payment processing you can view this tutorial
Conclusion
Vuex is a state management package for Vue.js that handles modifications to the state tree within a single source of truth called aptly the State. The State can only be modified with Mutators which must be syncronous functions. To run asynchronous functions or perform other tasks we can define Actions which can be called from components and ultimately call Mutators. We can access the State values within components through Getter functions. The mapGetters and mapActions can simplify our component definitions.
Though Vuex brings in many new concepts to Vue.js application development it can be very helpful in managing complex application state. It is not necessary or required for many Vue.js applications but learning knowing about it can make you a better, more productive developer.
Further resources and groups
Vue.js SF - https://www.meetup.com/VuejsSF/
Vue.sf - https://www.meetup.com/vue-sf/
Vue Medium publication - https://medium.com/js-dojo
Tools
Caching - https://github.com/superwf/vuex-cache
Persist State - https://github.com/robinvdvleuten/vuex-persistedstate
UI Toolkit - https://github.com/ElemeFE/element
Build Setup
# install dependencies npm install # serve with hot reload at localhost:8080 npm run dev # build for production with minification npm run build