![]()


vee-validate is a template-based validation framework for Vue.js that allows you to validate inputs and display errors.
Being template-based you only need to specify for each input what kind of validators should be used when the value changes. The errors will be automatically generated with 40+ locales supported. Many rules are available out of the box.
This plugin is inspired by PHP Framework Laravel's validation.
Installation
yarn
yarn add vee-validate npm
npm i vee-validate --save CDN
vee-validate is also available on these CDNs:
When using a CDN via script tag, all the exported modules on VeeValidate are available on the VeeValidate Object. ex: VeeValidate.Validator
Getting Started
In your script entry point:
import Vue from 'vue'; import VeeValidate from 'vee-validate'; Vue.use(VeeValidate);Now you are all setup to use the plugin.
Usage
There are two ways to use vee-validate:
Using Components (recommended)
This is available in 2.1 onwards.
Import the ValidationProvider component and register it:
import { ValidationProvider } from 'vee-validate'; // Register it globally // main.js or any entry file. Vue.component('ValidationProvider', ValidationProvider); // or register it locally in a component // mycomponent.vue export default { components: { ValidationProvider } };All the JavaScript work is done. Next in the template add the inputs you want to validate them:
With Vue 2.6.0+
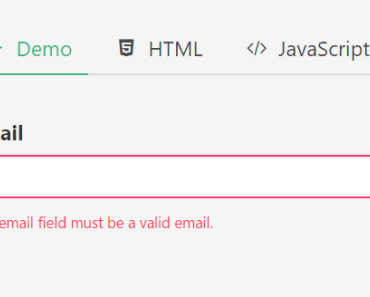
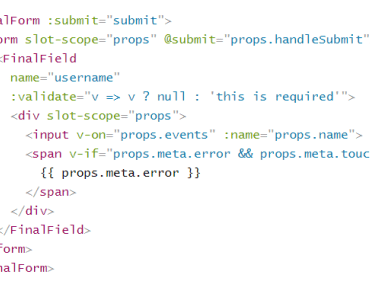
<validation-provider name="email" rules="required|email"> <template #default="{ errors }"> <input v-model="email"> <p>{{ errors[0] }}</p> </template> </validation-provider>Before Vue 2.6.0
<validation-provider name="email" rules="required|email"> <div slot-scope="{ errors }"> <input v-model="email"> <p>{{ errors[0] }}</p> </div> </validation-provider>The validation provider accepts two props: rules which is in its simplest form, a string containing the validation rules separated by a | character, and a name prop which is the field name that will be used in error messages.
and That's it, your input will be validated automatically, notice that the ValidationProvider uses scoped slots to pass down validation state and results.
There is more that can be done! You can customize events, validate initial values, manually validate or reset the field and much more. Make sure to read the docs.
Using directive
Apply the v-validate directive on your input and pass a string value which is a list of validations separated by a pipe. For example, we will use the required and the email validators:
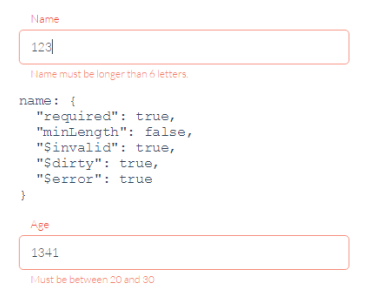
<input v-validate="'required|email'" type="text" name="email">Now every time the input changes, the validator will run the list of validations from left to right, populating the errors helper object whenever an input fails validation.
To access the errors object (in your vue instance):
this.$validator.errorBag; // or this.errors; // injected into $data by the plugin, you can customize the property name.Let's display the error for the email input we've created:
<!-- If it has an email error, display the first message associated with it. --> <span v-show="errors.has('email')">{{ errors.first('email') }}</span>Documentation
Read the documentation and demos.
Compatibility
This library uses ES6 Promises so be sure to provide a polyfill for it for the browsers that do not support it.
Contributing
You are welcome to contribute to this project, but before you do, please make sure you read the contribution guide.
Tutorials and Examples
Articles
- Validation Providers
- Authoring Validatble Vue Components
- Vue Multi Step Form by Dave Stewart
- An imperative guide to forms in Vue.js by Olayinka Omole.
- Template Driven Form Validation In Vue.js by Ogundipe Samuel Ayo
- Make Validation Great Again! Vue form validation with vee validate by Nick Hall
Credits
- Some validations/test scenarios are provided/based on validator.js.
- Inspired by Laravel's validation syntax.
license
MIT