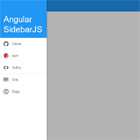

[Discontinued] Native-like Framework
Native-like menu drawer, pull-to-sync, action button, in-app-toast notification, three-dot-menu and burger menu icon implementation for angular mobile/desktop apps.
- using hammer.js for better touch support.
- fully animated burger menu icon
- nice and smooth menu drawer (slide from left)
- animated pull-to-refresh with callback
- in-app-toast messages with true/false callback
- three-dot-menu for secondary actions
- animated action button (optional: see Configuration)
- adjust content height (optional: see Configuration)
- ~13kB minified.
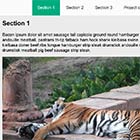
Example app
There is example app, feel free to check it and play with it here
Content
- Why this?
- Getting started
- nlFramework modules
- Additional stuff
- Objects
- Configuration
- Styles
- Example code
- Example app
- Schmeckels
- Licence
Why this?
If you are developing application for android with Phonegap or Ionic or other alternative, this is exactly for you. I've been struggling with menu implementations, found some but never got the feel and usability i wanted. No touch support or slow/no animations, if there was animations, they mostly have lags.
With nlFramework you have touch support, slide open/close/toggle menu, action button, pull-to-refresh, in app toast notification, three-dot-menu and all with smooth hardware accelerated animations.
Getting started
To start using nlFramework in your app include hammer.js, ng-nlFramework-min.js and ng-nlFramework.css in your project:
<script src="hammer.js"></script> <script src="ng-nlFramework-min.js"></script> <link href="ng-nlFramework.css" rel="stylesheet">nlFramework modules
Lets take a look at all the modules that nlFramework has.
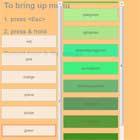
$nlDrawer
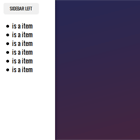
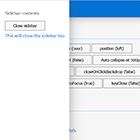
To make this module work, first you need to insert element with #nlDrawer id.
<!-- body of the menu drawer --> <div id="nlDrawer"> Your menu content </div>then just pass options to $nlFramework.init() function which will initialize the drawer. You can listen to callback openCb and closeCb.
var nlOptions = { drawer: { maxWidth: 300, openCb: function(){ console.log('nlDrawer: openned') }, closeCb: function(){ console.log('nlDrawer closed') } } }And the work is done.
Here is what the module contains:
- $nlDrawer
show(): shows the drawer (slide in)hide(): hides the drawer (slide out)toggle(): toggles the drawer (show/hide)openned: returns true/false if the drawer is openned/closed
Optionally you can use #nlBurger (see $nlBurger) with #nlTopbar (see $nlTopbar).
$nlBurger
This simple module takes care of the burger menu icon animation.
var nlOptions = { burger: { use: true } }If You want, you can include burger HTML element in your code and assign custom action:
<div id="nlBurger" onclick="doSomething()"> <div id="burger-top"></div> <div id="burger-center"></div> <div id="burger-bottom"></div> </div>Here is what $nlBurger can do:
- $nlBurger
toggle(): Toggles the burger ON/OFFsetOn(): Toggles the burger ONsetOff(): Toggles the burger OFF
$nlRefresh
Pull-to-refresh module. Is hidden behind #nlTopbar and waits for pulling to show itself.
For this module to work, pass options to $nlFramework.init(), which will initialize the module and adds *#nlTopbar and #nlRefresh to your code.
var nlOptions = { refresh: true }This will start the module and assign pull action to #nlTopbar.
To add custom callback assign some function to refresh.callback which by default just prints something in the console. In order to properly stop the refreshing animation, you must call $nlRefresh.syncEnd() at the end of your task otherwise the animation will go forever.
You can also change the default colors for inactive and active state of the refresh indicator.
var nlOptions = { refresh: { defaultColor: '#aa3344', // default(inactive) color activeColor: '#558844', // active color callback: function(){ // here is just timeout to wait 5sec before ending sync animation setTimeout( function(){ console.log( 'nlRefresh custom callback' ); // after doing some stuff end syncing animation $nlRefresh.syncEnd(); }, 5000 ); } } }Here is what the module contains:
- $nlRefresh
callback(): your custom callback function- remeber to call
syncEnd()at the end of your process to end the animation
- remeber to call
syncEnd(): as mentioned above, this ends the syncing animation
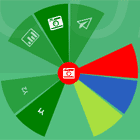
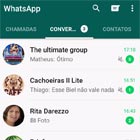
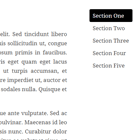
$nlToast
Very simple toast notification which shows text that was passed to it.
To make this work, pass this options to your $nlFramework.init() function:
var nlOptions = { toast: true }Now you can start using notifications.
Set the options and bring the toast:
function toastOk(){ console.log('Custom CB True'); } function toastFalse(){ console.log('Custom CB False'); } // set options var options = { title: 'I\'m a Toast! Yummy!', trueCallback: toastOk(), falseCallback: toastFalse(), timeout: 2500 } $nlTaost.show( options )Boom, toast!
Here is what $nlToast contains:
- $nlToast
init(): initialize the toast notificationsshow(options): show notification, accepted options:textcan be any stringpositiondisplay 'top' or 'bottom' toast (optional)trueCallbackcan be any function (optional)falseCallbackcan be any function (optional)timeout: number (milliseconds), if you don not set the timeout, notification stays until canceled by user (optional)
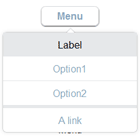
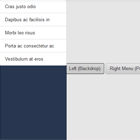
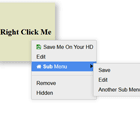
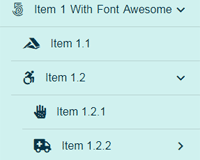
$nlMenu
three-dot-menu in the top right corner, this is very simple to use, just place your ul->li items with callback here and initialize - tadaa.
HTML for menu module:
<!-- secondary three-dot-menu --> <div id="nlMenu"> <div id="nlMenuContent"> <!-- place your menu content here --> <ul> <li ng-click="toast.show({title:'Selected Share',timeout: 2500})">Share</li> <li ng-click="toast.show({title:'Selected Edit',timeout: 2500})">Edit</li> <li ng-click="toast.show({title:'Thanks!',timeout: 1000})">Hug someone</li> </ul> </div> </div>Initialize the menu by passing options to $nlFramework.init() function:
var nlOptions = { secMenu: true }and now you have show() and hide() functions available.
$nlMenu.show(); $nlMenu.hide();And that is all what $nlMenu can do:
- $nlMenu
show(): shows the menuhide(): hides the menu
Additional stuff
#nlContent
Is where you content belongs, this part is optional and not needed for nlFramework to work. If you are using it, you must add #nlInner to your content element (in this case I am rendering my content in ng-view so that element must have id nlInner), this just adds basic styles to make the content always at least 100% height to fill up the space. (you can see ng-nlFramework.css/scss, nothing fancy)
<!-- view content - used as a wrapper --> <div id="nlContent"> <!-- your part of the code, views etc.. --> <div id="nlInner" ng-view=""></div> </div>#nlTopbar
This is just help object used by $nlRefresh or can be used just for holding title or gibe background for nlBurger and nlMenu.
<div id="nlTopbar" class="depth z1"></div>#nlFab
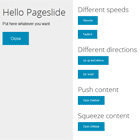
Action button with two sub actions which will show after the main (#nlPlus) button is clicked/tapped.
If you want to use this You need to enable it in configuration when initializing the drawer, see Configuration for more info.
<!-- action button --> <div id="nlFab" class="switch"> <div class="action-button depth z1 option one" ng-click="toast.show({title: 'At the TOP!', position: 'top', timeout: 2500});"> 2 </div> <div class="action-button depth z1 option two" ng-click="toast.show({title: 'At the BOTTOM!', timeout: 2500});"> 1 </div> <div id="nlPlus" class="action-button depth z1 plus"> <span> + </span> </div> </div>And that is all what $nlFab can do:
- $nlFab
toggle(): toggles the FAB icon
Objects
Apart from $nlDrawer, $nlBurger, $nlRefresh, $nlToast and $nlMenu there are also $nlConfig which contains all the settings, and core module $nlFramework with shortcuts to all other modules.
$nlConfig
You can set custom configuration of some modules and thier HTML elements. $nlConfig holds the configuration of all the modules.
- $nlConfig: contains all options and variables of nlFramework
options: contains drawer, burger, refresh and content options (see Configuration)drawer: drawer settingsburger: burger options onlyrefresh: pull-to-refresh optionscontent: content specific settings
$nlFramework
You can use the parts separately or use this one module which shortcuts to all other modules:
- $nlFramework
drawer(): shortcut to $nlDrawerburger(): shortcut to $nlBurgerrefresh(): shortcut to $nlRefreshtoast(): shortcut to $nlToastmenu(): shortcut to $nlMenufab(): shortcut to $nlFabset(): set nlFramework options (see Configuration)config: shortcut to $nlConfig
Configuration
You can use $nlFramework function set() to set options.
var nlOptions = { // global settings speed: 0.2, animation: 'ease', // burger specific burger: { endY: 6, startScale: 1, // X scale of bottom and top line of burger menu at starting point (OFF state) endScale: 0.7 // X scale of bottom and top line of burger menu at end point (ON state) }, // content specific content:{ topBarHeight: 56, modify: true }, // drawer specific drawer: { maxWidth: 300, openCb: function(){ console.log('nlDrawer: openned') }, closeCb: function(){ console.log('nlDrawer closed') } }, // refresh specific refresh: { defaultColor: '#aa3344', // default(inactive) color activeColor: '#558844', // active color callback: function(){ // here is just timeout to wait 5sec before ending sync animation setTimeout( function(){ console.log( 'nlRefresh custom callback' ); // after doing some stuff end syncing animation $nlRefresh.syncEnd(); }, 5000 ); } } }; // set the options $nlFramework.set( nlOptions );Styles
There is ng-nativeDrawer.scss file with default styles and colors which are there for you ready to customize the look of nlFramework parts however you like.
Example code
In your main javascript file where you start your angular app you need to initialize the modules.
Here is example of all modules in one file:
// load nlFramework in your app var exampleApp = angular.module('exampleApp', ['ionic', 'nlFramework']); // include all parts of nlFramework exampleApp.run(function($rootScope, $ionicPlatform, $nlDrawer, $nlBurger, $nlRefresh, $nlConfig, $nlToast, $nlMenu) { /* Or include just core module and then use parts exampleApp.run(function($rootScope, $ionicPlatform, $nlFramework) $rootScope.fw = $nlFramework; $rootScope.drawer = $nlFramework.drawer; $rootScope.refresh = $nlFramework.refresh; $rootScope.burger = $nlFramework.burger; $rootScope.config = $nlFramework.config; $rootScope.toast = $nlFramework.toast; $rootScope.menu = $nlFramework.menu; */ $ionicPlatform.ready(function() { /* --------------------------- * nlFramework: * set options and initialize */ var nlOptions = { // global settings speed: 0.2, animation: 'ease', // use action button fab: true, // use toast messages toast: true, // burger specific burger: { endY: 6, startScale: 1, // X scale of bottom and top line of burger menu at starting point (OFF state) endScale: 0.7 // X scale of bottom and top line of burger menu at end point (ON state) }, // content specific content:{ modify: true, // modify content width and heidht? topBarHeight: 56 //topbar height to use when modify is set to true }, // drawer specific drawer: { maxWidth: 300, openCb: function(){ console.log('nlDrawer: openned') }, closeCb: function(){ console.log('nlDrawer closed') } }, // refresh specific refresh: { defaultColor: '#aa3344', // default(inactive) color activeColor: '#558844', // active color callback: function(){ // here is just timeout to wait 5sec before ending sync animation setTimeout( function(){ console.log( 'nlRefresh custom callback' ); // after doing some stuff end syncing animation $nlRefresh.syncEnd(); }, 5000 ); } }, fab: true, secMenu: true }; // initialize the framework $nlFramework.init( nlOptions ); // show drawer $nlDrawer.show(); // hide drawer $nlDrawer.hide(); // toggle burger OFF $nlBurger.toggle(); // toggle burger ON $nlBurger.toggle( true ); // set new options with nlFramework's set() $nlFramework.set({ speed: 0.6, drawer: { maxWidth: 250, }, animation: 'ease-out' }); // If you like you can register backbutton handle -------- $ionicPlatform.registerBackButtonAction(function () { if ( !$nlDrawer.openned ) { // thedrawer is closed - exit the app navigator.app.exitApp(); } else { // thedrawer is openned - close $nlDrawer.hide(); } }, 100); // ------------------------------------------------------- }); });Licence
Released under MIT Licence
Copyright © 2015 Filip Vincůrek