jstree
jsTree is jquery plugin, that provides interactive trees. It is absolutely free, open source and distributed under the MIT license.
jsTree is easily extendable, themable and configurable, it supports HTML & JSON data sources, AJAX & async callback loading.
jsTree functions properly in either box-model (content-box or border-box), can be loaded as an AMD module, and has a built in mobile theme for responsive design, that can easily be customized. It uses jQuery's event system, so binding callbacks on various events in the tree is familiar and easy.
You also get:
- drag & drop support
- keyboard navigation
- inline edit, create and delete
- tri-state checkboxes
- fuzzy searching
- customizable node types
Aside from this readme you can find a lot more info on jstree.com & the discussion group.
- Getting Started
- Working with events
- Interacting with the tree using the API
- More on configuration
- Plugins
- PHP demos moved to new repository
- License & Contributing
Getting Started
Include all neccessary files
To get started you need 3 things in your page:
- jQuery (anything above 1.9.1 will work)
- A jstree theme (there is only one theme supplied by default)
- The jstree source file
<script src="//cdnjs.cloudflare.com/ajax/libs/jquery/3.1.1/jquery.min.js"></script> <link rel="stylesheet" href="//cdnjs.cloudflare.com/ajax/libs/jstree/3.3.8/themes/default/style.min.css" /> <script src="//cdnjs.cloudflare.com/ajax/libs/jstree/3.3.8/jstree.min.js"></script>If you decide to host jstree yourself - the files are located in the dist folder. You can safely ignore the dist/libs folder.
Populating a tree using HTML
Now we are all set to create a tree, inline HTML is the easiest option (suitable for menus). All you need to do is select a node (using a jQuery selector) and invoke the .jstree() function to let jstree know you want to render a tree inside the selected node. $.jstree.create(element) can be used too.
<div id="container"> <ul> <li>Root node <ul> <li>Child node 1</li> <li>Child node 2</li> </ul> </li> </ul> </div> <script> $(function() { $('#container').jstree(); }); </script>You can add a few options when rendering a node using a data-attribute (note the quotes):
<li data-jstree='{ "selected" : true, "opened" : true }'>Root node ...Populating a tree using an array (or JSON)
Building trees from HTML is easy, but it is not very flexible, inline JS data is a better option:
<div id="container"></div> <script> $(function() { $('#container').jstree({ 'core' : { 'data' : [ { "text" : "Root node", "children" : [ { "text" : "Child node 1" }, { "text" : "Child node 2" } ] } ] } }); }); </script>Unlike the previous simple HTML example, this time the .jstree() function accepts a config object.
For now it is important to note that jstree will try to parse any data you specify in the core.data key and use it to create a tree. As seen in the previous example, if this key is missing jstree will try to parse the inline HTML of the container.
The required JSON format
The data you use must be in a specific format, each branch of the tree is represented by an object, which must at least have a text key. The children key can be used to add children to the branch, it should be an array of objects.
Keep in mind, you can use a simple string instead of an object if all you need is node with the given text, the above data can be written as:
[ { "text" : "Root node", "children" : [ "Child node 1", "Child node 2" ] } ]There are other available options for each node, only set them if you need them like:
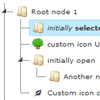
id- makes if possible to identify a node later (will also be used as a DOM ID of theLInode). Make sure you do not repeat the same ID in a tree instance (that would defeat its purpose of being a unique identifier and may cause problems for jstree).icon- a string which will be used for the node's icon - this can either be a path to a file, or a className (or list of classNames), which you can style in your CSS (font icons also work).data- this can be anything you want - it is metadata you want attached to the node - you will be able to access and modify it any time later - it has no effect on the visuals of the node.state- an object specifyng a few options about the node:selected- if the node should be initially selectedopened- if the node should be initially openeddisabled- if the node should be disabledchecked- checkbox plugin specific - if the node should be checked (only used whentie_selectionisfalse, which you should only do if you really know what you are doing)undetermined- checkbox plugin specific - if the node should be rendered in undetermined state (only used with lazy loading and when the node is not yet loaded, otherwise this state is automatically calculated).
type- types plugin specific - the type of the nodes (should be defined in the types config), if not set"default"is assumed.li_attr- object of values which will be used to add HTML attributes on the resultingLIDOM node.a_attr- object of values which will be used to add HTML attributes on the resultingAnode.
Here is a new demo with some of those properties set:
<div id="container"></div> <script> $(function() { $('#container').jstree({ 'core' : { 'data' : [ { "text" : "Root node", "state" : {"opened" : true }, "children" : [ { "text" : "Child node 1", "state" : { "selected" : true }, "icon" : "glyphicon glyphicon-flash" }, { "text" : "Child node 2", "state" : { "disabled" : true } } ] } ] } }); }); </script>Populating the tree using AJAX
Building off of the previous example, let's see how to have jstree make AJAX requests for you.
<div id="container"></div> <script> $(function() { $('#container').jstree({ 'core' : { 'data' : { "url" : "//www.jstree.com/fiddle/", "dataType" : "json" // needed only if you do not supply JSON headers } } }); }); </script>The server response is:
[{ "id":1,"text":"Root node","children":[ {"id":2,"text":"Child node 1"}, {"id":3,"text":"Child node 2"} ] }]Instead of a JS array, you can set core.data to a jQuery AJAX config. jsTree will hit that URL, and provided you return properly formatted JSON it will be displayed.
If you cannot provide proper JSON headers, set core.data.dataType to "json".
The ids in the server response make it possible to identify nodes later (which we will see in the next few demos), but they are not required.
WHEN USING IDS MAKE SURE THEY ARE UNIQUE INSIDE A PARTICULAR TREE
Populating the tree using AJAX and lazy loading nodes
Lazy loading means nodes will be loaded when they are needed. Imagine you have a huge amount of nodes you want to show, but loading them with a single request is way too much traffic. Lazy loading makes it possible to load nodes on the fly - jstree will perform AJAX requests as the user browses the tree.
Here we take our previous example, and lazy load the "Child node 1" node.
<div id="container"></div> <script> $(function() { $('#container').jstree({ 'core' : { 'data' : { "url" : "//www.jstree.com/fiddle/?lazy", "data" : function (node) { return { "id" : node.id }; } } } }); }); </script>The initial server response is:
[{ "id":1,"text":"Root node","children":[ {"id":2,"text":"Child node 1","children":true}, {"id":3,"text":"Child node 2"} ] }]Now to focus on what is different. First off the "data" config option of the data object. If you check with jQuery, it is supposed to be a string or an object. But jstree makes it possible to set a function.
Each time jstree needs to make an AJAX call this function will be called and will receive a single parameter - the node that is being loaded. The return value of this function will be used as the actual "data" of the AJAX call. To understand better open up the demo and see the requests go off in the console.
You will notice that the first request goes off to: http://www.jstree.com/fiddle?lazy&id=# # is the special ID that the function receives when jstree needs to load the root nodes.
Now go ahead and open the root node - two children will be shown, but no request will be made - that is because we loaded those children along with the first request.
Onto the next difference - "Child node 1" appears closed - that is because in the data we supplied true as the "children" property of this node (you can see it in the server response). This special value indicated to jstree, that it has to lazy load the "Child node 1" node.
Proceed and open this node - you will see a next request fire off to: http://www.jstree.com/fiddle?lazy&id=2 ID is set to 2 because the node being loaded has an ID of 2, and we have configured jstree to send the node ID along with the AJAX request (the data function).
The server response is:
["Child node 3","Child node 4"]You can also set "url" to a function and it works exactly as with "data" - each time a request has to be made, jstree will invoke your function and the request will go off to whatever you return in this function. This is useful when dealing with URLs like: http://example.com/get_children/1.
Populating the tree using a callback function
Sometimes you may not want jsTree to make AJAX calls for you - you might want to make them yourself, or use some other method of populating the tree. In that case you can use a callback function.
<div id="container"></div> <script> $(function() { $('#container').jstree({ 'core' : { 'data' : function (node, cb) { if(node.id === "#") { cb([{"text" : "Root", "id" : "1", "children" : true}]); } else { cb(["Child"]); } } } }); }); </script>As you can see your function will receive two arguments - the node whose children need to be loaded and a callback function to call with the data once you have it. The data follows the same familiar JSON format and lazy loading works just as with AJAX (as you can see in the above example).
Working with events
jstree provides a lot of events to let you know something happened with the tree. The events are the same regardless of how you populate the tree. Let's use the most basic event changed - it fires when selection on the tree changes:
<div id="container"></div> <script> $(function() { $('#container').jstree({ 'core' : { 'data' : [ {"id" : 1, "text" : "Node 1"}, {"id" : 2, "text" : "Node 2"}, ] } }); $('#container').on("changed.jstree", function (e, data) { console.log("The selected nodes are:"); console.log(data.selected); }); }); </script>All jstree events fire in a special ".jstree" namespace - this is why we listen for "changed.jstree". The handler itself receives one additional parameter - it will be populated with all you need to know about the event that happened. In this case data.selected is an array of selected node IDs (please note, that if you have not specified IDs they will be autogenerated).
Let's extend this a bit and log out the text of the node instead of the ID.
$('#container').on("changed.jstree", function (e, data) { console.log(data.instance.get_selected(true)[0].text); console.log(data.instance.get_node(data.selected[0]).text); });The two rows above achieve exactly the same thing - get the text of the first selected node.
In the data argument object you will always get an instance key - that is a reference to the tree instance, so that you can easily invoke methods.
All available functions and events are documented in the API docs
Interacting with the tree using the API
We scratched the surface on interacting with the tree in the previous example. Let's move on to obtaining an instance and calling a method on this instance:
<button>Select node 1</button> <div id="container"></div> <script> $(function() { $('#container').jstree({ 'core' : { 'data' : [ {"id" : 1, "text" : "Node 1"}, {"id" : 2, "text" : "Node 2"}, ] } }); $('button').on("click", function () { var instance = $('#container').jstree(true); instance.deselect_all(); instance.select_node('1'); }); }); </script>The above example shows how to obtain a reference to a jstree instance (again with a selector, but this time instead of a config, we pass a boolean true), and call a couple of methods - the latter one is selecting a node by its ID.
Methods can also be invoked like this:
$('#container').jstree("select_node", "1");All available functions and events are documented in the API docs
More on configuration
We already covered the config object in general (when we specified inline & AJAX data sources).
$("#tree").jstree({ /* config object goes here */ });Each key in the config object corresponds to a plugin, and the value of that key is the configuration for that plugin. There are also two special keys "core" and "plugins":
"core"stores the core configuration options"plugins"is an array of plugin names (strings) you want active on the instance
When configuring you only need to set values that you want to be different from the defaults.
All config options and defaults are documented in the API docs
$("#tree").jstree({ "core" : { // core options go here "multiple" : false, // no multiselection "themes" : { "dots" : false // no connecting dots between dots } }, "plugins" : ["state"] // activate the state plugin on this instance });We will cover all plugins further down.
Keep in mind by default all modifications to the structure are prevented - that means drag'n'drop, create, rename, delete will not work unless you enable them.
$("#tree").jstree({ "core" : { "check_callback" : true, // enable all modifications }, "plugins" : ["dnd","contextmenu"] });"core.check_callback" can also be set to a function, that will be invoked every time a modification is about to happen (or when jstree needs to check if a modification is possible). If you return true the operation will be allowed, a value of false means it will not be allowed. The possible operation you can expect are create_node, rename_node, delete_node, move_node and copy_node. The more parameter will contain various information provided by the plugin that is invoking the check. For example the DND plugin will provide an object containing information about the move or copy operation that is being checked - is it a multi tree operation, which node is currently hovered, where the insert arrow is pointing - before, after or inside, etc.
$("#tree").jstree({ "core" : { "check_callback" : function (operation, node, parent, position, more) { if(operation === "copy_node" || operation === "move_node") { if(parent.id === "#") { return false; // prevent moving a child above or below the root } }, return true; // allow everything else } }, "plugins" : ["dnd","contextmenu"] });The more parameter you receive contains other information related to the check being performed.
For example: move_node & copy_node checks will fire repeatedly while the user drags a node, if the check was triggered by the dnd plugin more will contain a dnd key, which will be set to true. You can check for more.dnd and only perform a certain action if dnd triggered the check. If you only want to perform an operation when a node is really about to be dropped check for more.core.
Plugins
jsTree comes with a few plugin bundled, but they will only modify your tree if you activate them using the "plugins" config option. Here is a brief description of each plugin. You can read more on the available config options for each plugin in the API docs.
checkbox
Renders a checkbox icon in front of each node, making multiselection easy. It also has a "tri-state" option, meaning a node with some of its children checked will get a "square" icon.
Keep in mind that if any sort of cascade is enabled, disabled nodes may be checked too (not by themselves, but for example when a parent of a disabled node is checked and selection is configured to cascade down).
$("#tree").jstree({ "plugins" : ["checkbox"] });contextmenu
Makes it possible to right click nodes and shows a list of configurable actions in a menu.
$("#tree").jstree({ "core" : { "check_callback" : true }, // so that modifying operations work "plugins" : ["contextmenu"] });dnd
Makes it possible to drag and drop tree nodes and rearrange the tree.
$("#tree").jstree({ "core" : { "check_callback" : true }, // so that operations work "plugins" : ["dnd"] });massload
Makes it possible to load multiple nodes in a single go (for a lazy loaded tree).
$("#tree").jstree({ "core" : { "data" : { .. AJAX config .. } }, "massload" : { "url" : "/some/path", "data" : function (nodes) { return { "ids" : nodes.join(",") }; } }, "plugins" : [ "massload", "state" ] });search
Adds the possibility to search for items in the tree and show only matching nodes. It also has AJAX / callback hooks, so that search will work on lazy loaded trees too.
<form id="s"> <input type="search" id="q" /> <button type="submit">Search</button> </form> <script> $("#container").jstree({ "plugins" : ["search"] }); $("#s").submit(function(e) { e.preventDefault(); $("#container").jstree(true).search($("#q").val()); }); </script>sort
Automatically arranges all sibling nodes according to a comparison config option function, which defaults to alphabetical order.
$("#tree").jstree({ "plugins" : ["sort"] });state
Saves all opened and selected nodes in the user's browser, so when returning to the same tree the previous state will be restored.
$("#tree").jstree({ // the key is important if you have multiple trees in the same domain "state" : { "key" : "state_demo" }, "plugins" : ["state"] });types
Makes it possible to add a "type" for a node, which means to easily control nesting rules and icon for groups of nodes instead of individually. To set a node type add a type property to the node structure.
$("#tree").jstree({ "types" : { "default" : { "icon" : "glyphicon glyphicon-flash" }, "demo" : { "icon" : "glyphicon glyphicon-ok" } }, "plugins" : ["types"] });unique
Enforces that no nodes with the same name can coexist as siblings - prevents renaming and moving nodes to a parent, which already contains a node with the same name.
$("#tree").jstree({ "plugins" : ["unique"] });wholerow
Makes each node appear block level which makes selection easier. May cause slow down for large trees in old browsers.
$("#tree").jstree({ "plugins" : ["wholerow"] });More plugins
If you create your own plugin (or download a 3rd party one) you must include its source on the page and list its name in the "plugins" config array.
// conditional select (function ($, undefined) { "use strict"; $.jstree.defaults.conditionalselect = function () { return true; }; $.jstree.plugins.conditionalselect = function (options, parent) { this.activate_node = function (obj, e) { if(this.settings.conditionalselect.call(this, this.get_node(obj))) { parent.activate_node.call(this, obj, e); } }; }; })(jQuery); $("#tree").jstree({ "conditionalselect" : function (node) { return node.text === "Root node" ? false : true; }, "plugins" : ["conditionalselect"] });As seen here when creating a plugin you can define a default config, add your own functions to jstree, or override existing ones while maintaining the ability to call the overridden function.
PHP demos moved to new repository
https://github.com/vakata/jstree-php-demos
License & Contributing
Please do NOT edit files in the "dist" subdirectory as they are generated via grunt. You'll find source code in the "src" subdirectory!
If you want to you can always donate a small amount to help the development of jstree.
Copyright (c) 2014 Ivan Bozhanov (http://vakata.com)
Licensed under the MIT license.