jQuery Retina Plugin
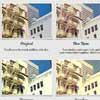
Retina based devices (iPhones, iPads, and soon many more mobile devices and desktops) make images look pretty crummy. A fix to this is to swap out the image for one that is twice the size. For example, if your image is 300px wide and 200px tall, you'll want to display an image that is 600px wide and 400px tall - even though it still takes up 300x200px of screen real estate.
There are a number of scripts that already do this. However, they didn't provide me the file name flexibility that I required. I wanted a script that would work on platforms like Drupal, Wordpress as well as custom systems.
There are three ways to enable retina images with this plugin:
- add the attribute 'data-retina' to the image tag
- call the function with a suffix passed in (ex: '-2x')
- include a call back so that you can use any other logic to find the file name. This is useful in systems like Wordpress which uses filenames like image-200x300.jpg.
Just an FYI, there appears to be some problems on the iPad when downloading jpg's larger than 2mb. The current fix is to use progressive jpg's. Although I hope this will be resolved soon. Read more here: http://duncandavidson.com/blog/2012/03/retina_web_thoughts
Getting Started
Download the production version or the development version.
View example: http://retina.tylercraft.com/
In the browser:
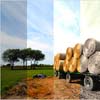
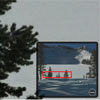
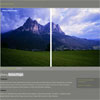
<script src="http://code.jquery.com/jquery.js"></script> <script src="jquery.retina.min.js"></script> <script> // By default the plugin searches for a data-retina attribute on the image $('#test-1 img').retina(); </script> <div id="test-1"><a href="http://www.flickr.com/photos/tylerc/5866513236/"><img src="dolomites-small.jpg" data-retina="dolomites-large.jpg"></a></div> <script> // Check server first. If image doesn't exist, it's not swapped out $('#test-2 img[data-retina]').retina({checkIfImageExists: true}); </script> <div id="test-2"><a href="http://www.flickr.com/photos/tylerc/6869244165/"><img src="st-john-small.jpg" data-retina="st-john-large.jpg"></a></div> <script> // Replaces the image with rmnp-2x.jpg $('#test-3 img.retina').retina({suffix: "-2x"}); </script> <div id="test-3"><a href="http://www.flickr.com/photos/tylerc/4916734631/"><img src="rmnp.jpg" class="retina"></a></div> <script> function myCustomFileNameLogic($obj){ return 'bigsur-1000x788.jpg'; } $('#test-4 img.retina').retina({customFileNameCallback: myCustomFileNameLogic, checkIfImageExists: true}); </script> <div id="test-4"><a href="http://www.flickr.com/photos/tylerc/5211508593/"><img src="bigsur-500x394.jpg" class="retina"></a></div>Syntax:
$('img').retina({ // Check for data-retina attribute. If exists, swap out image dataRetina: true, // Suffix to append to image file name suffix: "", // Check if image exists before swapping out checkIfImageExists: false, // Callback function if custom logic needs to be applied to image file name customFileNameCallback: "", // override window.devicePixelRatio overridePixelRation: false });Contributing
To get started contributing to jQuery.retina.js, install grunt globally ($ npm install grunt -g ).
Do not edit files in the "dist" directory as they are generated via grunt. You'll find source code in the "src" subdirectory. Work inside of the src directory, and use grunt to concat/min/test/lint the code before making a pull request. Running $ grunt watch from the root of this project will do this for you as you go.
Release History
- 2012/03/25 - v1.0 - Initial release
License
Copyright (c) 2012 Tyler Craft Licensed under the MIT, GPL licenses.