Cleave.js


Cleave.js has a simple purpose: to help you format input text content automatically.
Features
- Credit card number formatting
- Phone number formatting (i18n js lib separated for each country to reduce size)
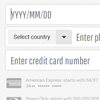
- Date formatting
- Numeral formatting
- Custom delimiter, prefix and blocks pattern
- CommonJS / AMD mode
- ReactJS component
- AngularJS directive (1.x)
- ES Module
TL;DR the demo page
Why?
The idea is to provide an easy way to increase input field readability by formatting your typed data. By using this library, you won't need to write any mind-blowing regular expressions or mask patterns to format input text.
However, this isn't meant to replace any validation or mask library, you should still sanitize and validate your data in backend.
Installation
npm
npm install --save cleave.jsold school
Grab file from dist directory
Usage
Simply include
<script src="cleave.min.js"></script> <script src="cleave-phone.{country}.js"></script>
cleave-phone.{country}.jsaddon is only required when phone shortcut mode is enabled. See more in documentation: phone lib addon section
Then have a text field
<input class="input-phone" type="text"/>Now in your JavaScript
var cleave = new Cleave('.input-phone', { phone: true, phoneRegionCode: '{country}' });
.input-elementhere is a unique DOM element. If you want to apply Cleave for multiple elements, you need to give different CSS selectors and apply to each of them, effectively, you might want to create individual instance by a loop, e.g. loop solution
More examples: the demo page
CommonJS
var Cleave = require('cleave.js'); require('cleave.js/dist/addons/cleave-phone.{country}'); var cleave = new Cleave(...)AMD
require(['cleave.js/dist/cleave.min', 'cleave.js/dist/addons/cleave-phone.{country}'], function (Cleave) { var cleave = new Cleave(...) });ES Module
// Rollup, WebPack import Cleave from 'cleave.js'; var cleave = new Cleave(...) // Browser import Cleave from 'node_modules/cleave.js/dist/cleave-esm.min.js'; var cleave = new Cleave(...)TypeScript
Types are contributed by the community and are available via npm install --save-dev @types/cleave.js. Once installed, you can import Cleave like the following:
import Cleave = require('cleave.js');Types for the React-component are also available and can be imported in the same way.
import Cleave = require('cleave.js/react');ReactJS component usage
import React from 'react'; import ReactDOM from 'react-dom'; import Cleave from 'cleave.js/react';Then in JSX:
class MyComponent extends React.Component { constructor(props, context) { super(props, context); this.onCreditCardChange = this.onCreditCardChange.bind(this); this.onCreditCardFocus = this.onCreditCardFocus.bind(this); } onCreditCardChange(event) { // formatted pretty value console.log(event.target.value); // raw value console.log(event.target.rawValue); } onCreditCardFocus(event) { // update some state } render() { return ( <Cleave placeholder="Enter your credit card number" options={{creditCard: true}} onFocus={this.onCreditCardFocus} onChange={this.onCreditCardChange} /> ); } }As you can see, here you simply use <Cleave/> as a normal <input/> field
- Attach HTML
<input/>attributes - Pass in the custom
optionsprop - Add ReactJS
onChangeevent listener
Advanced usage:
- How to pass default value
- How to get ref of cleave instance and call methods
- How to update raw value
- How to get ref of the input field
- How to use it with redux form
Usage for Webpack, Browserify and more in documentation: ReactJS component usage
AngularJS directive usage
First include the directive module:
<script src="cleave.js/dist/cleave-angular.min.js"></script> <script src="cleave.js/dist/addons/cleave-phone.{country}.js"></script>And in your model:
angular.module('app', ['cleave.js']) .controller('AppController', function($scope) { $scope.onCreditCardTypeChanged = function(type) { $scope.model.creditCardType = type; }; $scope.model = { rawValue: '' }; $scope.options = { creditCard: { creditCard: true, onCreditCardTypeChanged: $scope.onCreditCardTypeChanged } }; });Then easily you can apply cleave directive to input field:
<div ng-controller="AppController"> <input ng-model="model.rawValue" ng-whatever="..." type="text" placeholder="Enter credit card number" cleave="options.creditCard"/> </div>More usage in documentation: Angular directive usage
jQuery fn usage
Please check here
Playground
Documentation
Run tasks
npm installBuild assets
gulp buildRun tests
gulp testLint
gulp eslintPublish (build, tests & lint)
gulp publishFor contributors, please run
gulp publishto ensure your PR passes tests and lint, also we have a not in the plan list you may concern.
Get in touch
- Twitter: @rison
References
- Payment credit card number IIN https://en.wikipedia.org/wiki/Payment_card_number#Issuer_identification_number_.28IIN.29
- Google phone numbers formatting https://github.com/googlei18n/libphonenumber
- Decimal mark and thousands separating style https://en.wikipedia.org/wiki/Decimal_mark#Examples_of_use
Licence
Cleave.js is licensed under the Apache License Version 2.0
- Google libphonenumber is included under its Apache License Version 2.0