intercom
A console for the web
Intercom is a JavaScript-based console I/O system designed for easy extension using a module system.
Contents
- Installation
- Creating Modules
- API
1. Installation
Installing a setup of intercom is as simple as dropping the project files into your folder of choice. To add a module to your installation, use the include() function.
include("filename.js")
Or use an html script src directly:
<script type='text/javascript' src='module_name.js'></script>
2. Creating Modules
An intercom module is a standardized JavaScript file which is included into the main file with a JS inclusion tag. Creating a module is as simple as creating a new file.
This quick tutorial will create a "Hello World" module. First, create your file, call it hello.js. The first bit of code we need to do is have the module identify itself to intercom. We do this with:
identifyPlugin("hello"); This will be picked up by intercom on page load and will cause intercom to add 'hello' to the list of installed plugins.
We can then add the module's parser to the parser list with:
addParser(hello_hook); This will add hello's hook parser to the parser list for intercom. A parser is simply a function which intercom will pass the user's input to in order to take action on it.
So now we need to actually make the module do something. We do this by defining the parser function:
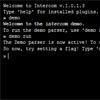
function hello_hook(input) { if (checkCommand(input, "hello")) { output("Hello World!"); quitParse(); } } We now have a working module! A boring one, but thats better than nothing! Now if you visit your index.html and type the hello command, you'll see your handiwork output back to you. quitParse(); is used to tell intercom to stop looking for more matches to the input once your code has run.
Let's add a flag to our module's call. Using intercom's flag functionality is pretty simple. We use one function to generate a flags object followed by another function call to check the flags. Let's alter our hook parser function to take a -greeting flag which lets the user set the greeting:
function hello_hook(input) { if (checkCommand(input, "hello")) { hello_flags = extractFlags(input); if (hasFlag(hello_flags, "greeting")) { output(flagValue(hello_flags, "greeting")); } else { output("Hello World!"); } quitParse(); } } So now we can call hello -greeting=Wassap and get a whole new greeting.
NOTE: Strings with more than one word cannot currently be flag values.
Finally, let's cause our hook function to redirect intercom's input to a custom parser. Again, we will update our hook function:
function hello_hook(input) { if (checkCommand(input, "hello")) { hello_flags = extractFlags(input); if (hasFlag(hello_flags, "greeting")) { output(flagValue(hello_flags, "greeting")); } else if (hasFlag(hello_flags, "parse")) { quitParse(); setInputStream(hello_parser); } else { output("Hello World!"); } quitParse(); } } Now, when the flag -parse is set, we are changing the input stream from the main input stream to a custom parser. Here we can define the parser to simply output anything which the user types:
function hello_parser(input) { output(input); if (input == "quit") { resetInputStream(); } } We now have a custom input parser with a quit command. Try it out now! Run hello -parse in your intercom setup and feel the magic.
That's all there is to it! Using the tools in the API for intercom, you can create online programs and modules which you can quickly run from your intercom console.
3. API
identifyPlugin(title)
Identifies a module to intercom to be added to the list of installed modules.
addParser(parser)
Adds a parser function to the main intercom parser. Used primarily to add _hook functions which pick up on user input to start a program/module.
clearScreen()
Clears the output on the screen.
none(input)
Serves as a null parser. Set the input stream to none in order to ignore all input.
output(text [, style, arrow])
Outputs text to the console. Optional params: style - CSS style to apply to the text to be printed; arrow - boolean, if true, display the arrow. Defualt is false
quitParse()
Used to quit the parsing system after a match is made.
setInputStream(newStream)
Switches the input stream to a different parser.
resetInputStream()
Set the input stream back to the main parser.
outputPostCall(url, params)
Does a post call to url with the given params array, outputs the return data.
returnPostCall(url, params)
Does a post call to url with the given params array, returns the return data.
extractFlags(input)
Extracts the user defined flags in a given line of input. Returns an associative array of flag=value, where value is true if the flag is a boolean on/off.
hasFlag(flags, find)
Given a flags object (see: extractFlags) and a flag, returns true if the flag exists in the set of flags.
countFlags(flags)
Returns the number of user defined flags.
flagValue(flags, key)
Returns the value of a user defined flag.
checkCommand(input, command)
Returns true if the input command matches the given command.
extractArguments(input)
Returns an array of arguments from the given input.
include(filepath)
Loads the given js file into the DOM
run(command)
Runs the given command on intercom
Objects
HelpText
This object is for module developers to use to write their module's help text. Create a new HelpText object with HelpText(), then use its four methods to modify your help text:
HelpText.addFlag(flag, description)
Adds a flag to the help text. Do not include the dash, just the flag, and a description of what it does.
HelpText.addCommand(command, description)
Adds a command to the help text.
HelpText.addMisc(text)
Adds text to the end of the help text.
HelpText.setIntro(text)
Sets the introduction text for the help text. Unlike the other methods, this will overwrite what has already been set as the intro text if you call it multiple times.