StoryMapJS: Maps that tell stories.
StoryMapJS is a simple tool to help you tell stories with maps. If you're not a programmer, you don't need to spend much time on the GitHub page—instead, go StoryMapJS
If you want information on creating JSON with your own code and embedding it, see the "Advanced" documentation on the StoryMap website.
The rest of this document gets into a few technical details that some folks might want.
TL;DR
Follow this quickstart guide to get StoryMapJS set up locally or see below for a more in-depth process explanation.
- Clone the StoryMapJS repository to your machine.
- Clone the fabfile repository into the same parent folder that stores the StoryMap repo.
- Install virtualenv, virtualenvwrapper, MongoDB, Node.js, LESS and UglifyJS.
- To run the server, copy
env.sh.sampletoenv.shand, if necessary, modify any values in it. Execute this script withsource env.shwhen you are working on StoryMapJS. If you're unsure whether you need to run the server for your project, see below this quickstart for more information. - Set up your virtual environment:
mkvirtualenv storymapjs - Activate the virtual environment:
workon storymapjs - Install python requirements:
pip install -r requirements.txt fab buildthe project- Start making changes!
- To see your changes, run a simple local web server (we like http-server) and load the following url (assuming your local server runs on port 8080):
http://0.0.0.0:8080/embed/index.html?url=http://media.knightlab.com/StoryMapJS/demo/sochi.json
Setup for working on the StoryMap editor
There are a number of environment variables critical to working on the editor that are only available to Knight Lab staff and students. Ask a staff member for this information if applicable.
Contributing translations for new languages
StoryMap's older sibling, TimelineJS has proven internationally popular, in part because users have contributed translation support for dozens of languages. StoryMap is also ready to be used in languages other than English, but once again, we'll need your help.
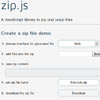
For each language, we need a simple file with a name like *xx*.js, where xx is the two letter code for the language. (Technically, it's the ISO 639-1 code—you can find a list of them on Wikipedia.) The file defines a Javascript object with language specific translations. To make one for your language, copy one of the existing files (like this one for Spanish) and edit the quoted strings. Please don't change the "keys"—the unquoted strings. If you know how to use GitHub to make a pull request, that's the best way to submit it to us. If that's not your thing, you can add a comment to this support thread and upload your translation as an attachment.
GigaPixel
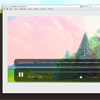
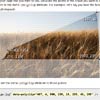
Images are rendered so when set to be map_as_image the entire image is shown. When set as cartography the zoom will set so that all the markers fit.
Points are set to only display on mouseover in image mode, but you can set map_as_image to false in the config options to always show the points. The points are hidden when the intent is an image so that nothing obstructs the image the viewer is looking at. Looking at a painting is hard with a bunch of points on it.
Map Options
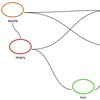
To disable connecting lines on maps use the StoryMap options: "Treat as Image" (as opposed to the default, "Treat as Cartography")
More config options available to do what you want with the line:
line_follows_path: true, // Map history path follows default line, if false it will connect previous and current only line_color: "#c34528",, line_color_inactive: "#CCC", line_join: "miter", line_weight: 3, line_opacity: 0.80, line_dash: "5,5", show_lines: true, show_history_line: true, To disable zoom calculation/edit zoom level set calculate_zoom to false in the config options.
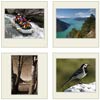
Images can now be used in place of map pins. Use image inside the location object and include a url to use. use_custom_markers also has to be set to true in the story map options. Same goes for custom icons except you need icon inside the location object and include a url to use.
Setting up a development environment
In order to stay consistent with other kinds of deployment tools, we use python and Fabric to build and deploy StoryMapJS. However, if you are comfortable using CodeKit, you can use it also: the rules for assembling the various files into a single final storymap.js are specified using CodeKit's syntax.
If you don't use CodeKit, you must have Python installed. We use python 2.7.
Clone our fabfile repository and place it in the same parent directory as your StoryMapJS repository.
Install virtualenv, virtualenvwrapper, MongoDB, Node.js, LESS and UglifyJS.
pip install virtualenv # Read the docs for complete installation pip install virtualenvwrapper npm install less -g npm install uglify-js -g If you need to run the server, copy env.sh.sample to env.sh and, if necessary, modify any values in it. Execute this script with source env.sh when you are working on StoryMapJS, or otherwise arrange for these environment variables to be set. There are a number of environment variables which are critical to running the server which involve Amazon Web Services and Google Application credentials which we do not store in GitHub. If you are at Knight Lab, see a staff developer for these values. If you are outside of Knight Lab, you may not
# Create a virtual environment # Make sure that your virtual enviornment uses Python 2.7.X # use the -p tag to choose python version if multiple installed mkvirtualenv storymapjs # Activate the virtual environemnt workon storymapjs # Install python requirements pip install -r requirements.txt Developing StoryMapJS - the javascript
If you are interested in contributing to the development of the StoryMapJS javascript library, that is about it. When you make changes to the code, you should execute the fab build command. (Be sure you have activated the virtual environment.) To test your changes, run a simple local web server with build as the document root. You can test your local work by loading a URL like this (assuming your local server runs on port 8080):
http://0.0.0.0:8080/embed/index.html?url=http://media.knightlab.com/StoryMapJS/demo/sochi.json You can change the URL to other examples. You can generally find the JSON for a StoryMap you've published by taking the StoryMap's direct URL and changing index.html to published.json.
As you work, don't forget to run fab build each time you make changes. When time allows, we hope to make this automatic, but we haven't budgeted the time yet.
Developing StoryMapJS - the authoring environment
StoryMapJS's authoring environment is rather more complex, and the instructions here are primarily directed at people who are directly involved with Knight Lab. The effort to make it easier for outside developers to contribute to this is higher than we can afford for the moment.
You must have MongoDB installed and running. You must copy the env.sh.example file to env.sh and edit the values accordingly. Specifically, there are a number of environment variables for access to outside services which do not belong in GitHub. Get those from a Knight Lab staff developer.
Be sure to execute env.sh every time you want to run the StoryMapJS server. An easy way to do that is using the virtualenvwrapper postactivate hook.
Once you've established the necessary environment variables, you should be able to...
# Run the development server fab serve Files located in the source directory are assets for storymapjs itself. The core Flask app which controls the server is api.py which uses library code in the storymap directory. The pages you see are built from files in templates.
At this time, edits to the HTML for the website are automatically visible when reloading the local server. Edits to CSS and JavaScript must be manually compiled before you'll see them. Run fab build. This is something we'd like to make more automatic eventually.
Note: Recent updates to Google's OAuth policies mean that the above only works for editing the StoryMapJS website/documentation. If you want to work on the authoring tool and test it locally, you will need to set up for local secure development.
First, you must create a certificate pair. These files should NOT be put in the repository. Use this command, executed from the root of the project repository:
openssl req -x509 -sha256 -nodes -days 10000 -newkey rsa:2048 -keyout local_only.key -out local_only.crt Once you've done this, to run the server, use this instead of the above command:
fab serve:ssl=y Of course, you'll need to use https://localhost:5000/select/ to access the authoring tool. You'll get a warning that the security certificate is not trusted. Disable that warning to proceed.
Developement with Local Storage
In order to work with the authoring environment locally, you have to enter the path to your cloned StoryMapJS repository as the value of LOCAL_DIRECTORY & LOCAL_STORAGE_MODE in your env.sh file.
export LOCAL_STORAGE_MODE=True export STORYMAPJS_DIRECTORY="FILL IN WITH PATH TO YOUR STORYMAPJS REPO DIRECTORY" A note about installing python requirements on Mac OS X 10.11 "El Capitan"
Apparently, Apple removed support for openssl in Mac OS X 10.11. Here's the solution we've found.
brew install opensslCFLAGS="-I$(brew --prefix openssl)/include -I$(xcrun --show-sdk-path)/usr/include" LDFLAGS="-L$(brew --prefix openssl)/lib" pip install -r requirements.txt
Troubleshooting
Users may be directed to our userinfo page to help with troubleshooting. This page provides information about the user's account and saved storymaps. The endpoint is https://storymap.knightlab.com/userinfo/
Using Atlassian localstack for development/testing
NOTE: boto3 is required for localstack. Until transition to boto3 is complete, development and testing involving s3 connections still requires AWS credentials
Be sure to have the aws cli installed (http://docs.aws.amazon.com/cli/latest/userguide/installing.html)
In your StoryMap virtualenvironment, install localstack and create the test bucket:
git clone https://github.com/atlassian/localstack.gitcd localstackmake clean install testmake infraaws --endpoint-url=http://localhost:4572 s3 mb s3://test.knilab.com