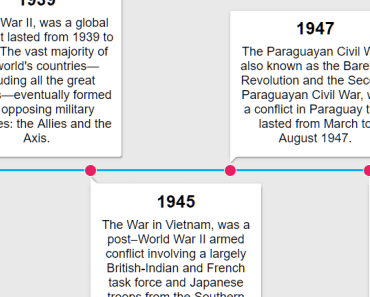
Vue Horizontal Timeline
Just a simple horizontal timeline component made with Vue.js.


Demo

How to install
npm
$ npm install vue-horizontal-timeline --saveyarn (recommended)
$ yarn add vue-horizontal-timelineQuick start
Vue.js
You can import in your main.js file
import Vue from 'vue' import VueHorizontalTimeline from 'vue-horizontal-timeline' Vue.use(VueHorizontalTimeline)Or locally in any component
import { VueHorizontalTimeline } from 'vue-horizontal-timeline' export default { components: { VueHorizontalTimeline } }Nuxt.js
You can import as a Nuxt.js plugin
~/plugins/vue-horizontal-timeline.js
import Vue from 'vue' import VueHorizontalTimeline from 'vue-horizontal-timeline' Vue.use(VueHorizontalTimeline)and then import it in your nuxt.config.js file
plugins: [ '~/plugins/vue-horizontal-timeline.js' ]Basic usage
<template> <vue-horizontal-timeline :items="items"/> </template> <script> export default { data() { const example1 = { title: 'Title example 1', content: 'Lorem ipsum dolor sit amet, consectetur adipiscing elit. Ut ex dolor, malesuada luctus scelerisque ac, auctor vitae risus. Vivamus risus dolor, faucibus a bibendum quis, facilisis eget odio.' } const example2 = { title: 'Title example 2', content: 'Lorem ipsum dolor sit amet, consectetur adipiscing elit. Ut ex dolor, malesuada luctus scelerisque ac, auctor vitae risus. Vivamus risus dolor, faucibus a bibendum quis, facilisis eget odio.' } const example3 = { title: 'Title example 3', content: 'Lorem ipsum dolor sit amet, consectetur adipiscing elit. Ut ex dolor, malesuada luctus scelerisque ac, auctor vitae risus. Vivamus risus dolor, faucibus a bibendum quis, facilisis eget odio.' } const items = [example1, example2, example3] return { items } } } </script>Props
| Property name | Type | Default | Description |
|---|---|---|---|
| items | Array | null | Array of objects to be displayed. Must have at least a content property |
| item-selected | Object | {} | Object that is set when it is clicked. Note that clickable prop must be set to true |
| item-unique-key | String | '' | Key to set a blue border to the card when it is clicked (clickable prop must be set to true) |
| title-attr | String | 'title' | Name of the property inside the objects, that are in the items array, to set the cards title |
| title-centered | Boolean | false | Centralizes the cards title |
| title-class | String | '' | If you want to set a custom class to the cards title, set it here |
| title-substr | String | 18 | Number of characters to display inside the cards title. Above this, will set a '...' mask |
| content-attr | String | 'content' | Name of the property inside the objects, that are in the items array, to set the cards content |
| content-centered | Boolean | false | Centralizes all the cards content text |
| content-class | String | '' | If you want to set a custom class to the cards content, set it here |
| content-substr | String | 250 | Number of characters to display inside the cards content. Above this, will set a '...' mask |
| has-slot | String | false | Set to true if you pass a <slot> to override title and content attributes |
| min-width | String | '200px' | Min-width of the timeline |
| min-height | String | '' | Min-height of the timeline |
| timeline-padding | String | '' | Padding of the timeline |
| timeline-background | String | '#E9E9E9' | Background color of the whole timeline |
| line-color | String | '#03A9F4' | Color of the line inside the timeline |
| clickable | Boolean | true | Makes the card clickable that returns the object |
Development
Fork the project and enter this commands in your terminal
git clone https://github.com/YOUR_GITHUB_USERNAME/vue-horizontal-timeline.git cd vue-horizontal-timeline yarnStorybook
For visual testing, this project contains storybook which you can run by doing the next command
$ yarn storybook:serveJest
Before making the PR, if you changed something that needs to be tested, please make the tests inside the tests/unit folder.
To run the tests, you can use the next command
$ yarn test:unitCommitlint
This project follows the commitlint guidelines, with minor changes.
You can commit using npm run commit to help you with that.
There's a pre-push hook that runs all the unit tests before you can push it.
If an error occurs, you can use the npm run commit:retry command that runs the previous npm run commit that you already filled.
TODO
- Add 100% test coverage
- Add demo website/code pen
- Publish in npm

License
MIT © guastallaigor